


Connecting Wires Using Soldering and WAGO Connectors with Polarity Match
Whether you're working on electrical projects or crafting intricate setups, knowing how to properly connect wires is essential for safety and efficiency. In this detailed guide, we'll walk you through two common methods: soldering and using Wago connectors. We'll also emphasise the importance of maintaining consistent wire polarity to ensure your connections work seamlessly.
Materials You'll Need:
- Wires to be connected
- Soldering iron and solder (if soldering)
- Wago connectors (if using)
- Wire stripper or cutter
- Dual Adhesive Heat shrink tubing (if soldering)
- Electrical tape (if using)
- Multimeter (for polarity verification)
Method 1: Soldering Wires
Step 1: Prepare the Wires
- Strip about 1 cm of insulation from each wire using a wire stripper.
- Twist the exposed wire strands to prevent fraying.
- For safety, we recommend the wires are feathered to ensure the opposing wires do not touch.
Step 2: Solder the Wires
- Heat your soldering iron and apply a small amount of solder to the tip.
- Hold the wires together with their stripped ends aligned.
- Touch the soldering iron's tip to the wires, allowing the heat to melt the solder and create a strong bond between the wires.
Step 3: Insulate with Heat Shrink Tubing (This step can be done before step 2 to make a more streamlined connection)
- Slide a piece of heat shrink tubing over the soldered area.
- Use a heat gun to shrink the tubing, providing insulation and protection to the solder joint.
Method 2: Using Wago Connectors
Step 1: Prepare the Wires
- Strip about 1 cm of insulation from each wire.
- Insert the stripped wires into the appropriate Wago connector slots (same polarities). Ensure each wire is securely inserted.
Step 2: Secure the Wires
- Press down on the orange lever of the Wago connector. This will securely clamp the wires in place.
Step 3: Verify Polarity
- Use a multimeter to verify that the wire polarity is consistent between the connections.
- Connect the multimeter probes to the corresponding wires to ensure positive (+) and negative (-) match.
General Tips:
- Weatherproofing: Employing electrical tape is an effective method for swiftly safeguarding your connection against environmental factors. Exercise caution, as any openings can pose potential hazards.
-
Maintain Consistent Polarity: To prevent electrical issues, ensure that the wires' polarity (positive and negative) matches correctly when connecting them. A reversed polarity can lead to equipment damage or malfunction.
-
Safety First: Always work in a well-ventilated area, and take necessary precautions to avoid burns when soldering. If using Wago connectors, handle them carefully to prevent any accidental damage.
-
Practice Good Wire Management: Keep the wire connections tidy by using cable ties, conduit, or other wire management solutions.
-
Test Your Connections: Before finalising your project, test the connected wires using appropriate electrical equipment to verify that the connections are functioning as intended.
-
Wear Safety Gear: When soldering, protect your hands with gloves and your eyes with safety goggles to prevent accidental burns or splashes.
By following this guide, you'll be able to confidently and safely connect wires using both soldering and Wago connectors while maintaining proper polarity. This skill will prove invaluable for a wide range of electrical and DIY projects.


Creating an LED Sign or Feature Using Flexible Neon Accessories
Flexible Neon lighting offers a versatile and captivating way to create stunning LED signs and features that draw attention and enhance the ambience of any space. With a wide range of neon sizes and complementary accessories, you can let your creativity shine and design captivating displays. Follow this detailed guide to harness the full potential of Flexible Neon accessories for crafting your own LED masterpiece.
Step 1: Choose Your Neon Size
Flexible Neon comes in various sizes, allowing you to customise your LED sign or feature according to your design and space requirements. Available sizes include:
- 6x12mm
- 8x16mm
- 8x10x16mm
- 10x13x22mm
- 13x15mm
Step 2: Plan Your Design
Decide on the layout, text, or pattern you want to create with your Flexible Neon LED sign. Take measurements of the area where you plan to install the sign to ensure the neon size fits perfectly.
Step 3: Gather Your Accessories
Flexible Neon accessories play a crucial role in achieving a professional and secure installation. Here's a breakdown of available accessories and their uses:
End Caps: Seal the ends of your Flexible Neon for protection and a clean finish. Available in various styles including regular, end cap with hole, side entry, and low entry.
Mounting Clips: Choose from stainless steel, aluminium, and plastic mounting clips to securely attach the neon to different surfaces. Available in various sizes to match your neon dimensions.
Mounting Channels: Aluminium and stainless steel mounting channels provide a secure and polished way to hold your neon in place. These channels can be bent to fit curved or straight surfaces. The flexible channel is a great way to hold the neon in place around curves and can be easily spray-painted to blend in with your amazing design.
Quick Connectors: Solderless connectors simplify the installation process by allowing you to easily connect neon segments without complex wiring.
Snap Connectors: Solderless connectors to simplify joining two separate pieces of neon together easily and quickly.
End Caps: Waterproof your design with end caps, using silicone glue to hold them in place. Even choose from ones with entry holes in almost every direction.
Coloured End Caps: Enhance the visual impact of your LED sign by using coloured end caps that match or contrast with your neon.
Step 4: Installation Follow these steps to assemble and install your LED sign or feature:
a. Assemble Neon: Using the quick connectors, join the individual neon segments together to form your desired design. Ensure the connections are secure.
b. Attach Mounting Clips: Depending on your surface, attach the appropriate mounting clips to the neon using adhesive or screws.
c. Insert Neon into Mounting Channels: For a more polished look, slide the neon into the aluminium or stainless steel mounting clips/channels, bending them as needed to match your design.
d. Install End Caps: Seal the ends of the neon with end caps using adhesive to maintain the IP rating.
Step 5: Powering Up
Connect the neon to an appropriate power source using trusted 12V LED drivers. Ensure you follow safety guidelines and adhere to electrical regulations during this step.
Step 6: Test and Adjust
Before finalising the installation, test the LED sign to ensure all neon segments are illuminated correctly. Make any necessary adjustments to positioning, angles, or connections.
Step 7: Secure and Enjoy
Once you're satisfied with the installation, secure all components in place and enjoy your custom LED sign or feature. Whether indoors or outdoors, your creation will captivate and illuminate its surroundings.
By utilising the wide array of Flexible Neon accessories and sizes, you can bring your creative visions to life, crafting unique and captivating LED signs and features that leave a lasting impression. Experiment with different combinations to achieve the desired aesthetics and lighting effects for your space.


Illuminating Trees with Festoon Lighting


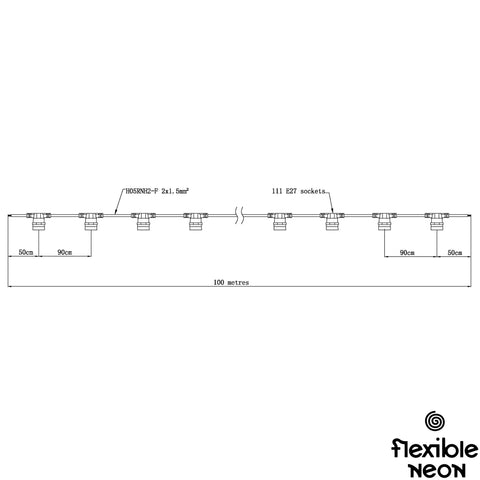
E27 Festoon Brochure
Welcome to Flexible Neon - Australian design, led by Mitch Harrison. Our festoon lights are thoughtfully crafted to combine aesthetics with safety and efficiency. Unlike traditional bulbs, there's no risk of broken glass and high voltage, ensuring peace of mind for all. Built with commercial-grade materials, our festoon lights boast the biggest range of bulbs to suit any ambience. Inexpensive to run and maintenance-free, they're an ideal solution for any occasion. Operating on 24V DC (AC/DC bulbs), our festoon light system is not just decorative, but also provides substantial illumination. Suitable for indoor and outdoor use, our IP-rated festoon lights promise durability and reliability.
Cable: Our festoon light cable comes with various socket spacing - 0.25m, 0.5m, and 0.9m - available in black or 0.5m in white. With the option of round or flat cables, you can choose the design that suits your needs best. For added versatility, we also offer 0.5m and 0.9m spacing with 0.4m droppers. Crafted from high-grade wire, our cables can accommodate long runs of up to 100m (depending on the bulb), ensuring flexibility in your lighting setup. The cable's simple yet intelligent design includes no separate flange, eliminating the risk of lost parts. For longer cable runs exceeding 7m, a support cable is recommended. Additionally, to prevent voltage drop, it's advisable to run a maximum of 10m from the LED Driver to the festoon cable for feeder cables.


Bulb: At Flexible Neon, we offer a wide selection of bulbs in various sizes for E27 fittings. Choose from a range of sizes, including G45, G60, G80, G95, G125, C35, Strobe and Cabochon, to perfectly suit your lighting needs. Within these sizes, we offer a diverse range of LED types/animations, filament colours, filament amounts, filament sizes, cap colours, and options for milky or clear caps. For added convenience, our bulbs are available in different wattage to match your desired brightness level.
In our vibrant colour range, you'll find over 7 different captivating colours to add an enchanting touch to any setting. Our bulbs operate on both AC and DC, ensuring compatibility with a variety of setups and making them highly versatile.
Rest assured that our bulbs are built to last, with a lifespan rated to over 10,000 hours, ensuring long-lasting illumination for your space. To ensure safety during use, our bulbs come equipped with a plastic cap, providing an extra layer of protection. With our extensive bulb collection, you'll find the perfect lighting solution for any event or space.
LED Drivers: Our commitment to quality extends to our LED drivers, where we exclusively use Meanwell LED Drivers. These drivers, available in various wattage, ensure stable and reliable 24V DC power for your festoon lights. Rated for outdoor use, our LED drivers are designed to withstand challenging environmental conditions.
Accessories: Enhance your festoon light setup with our range of accessories. We offer black and white droppers in 0.2m, 0.4m, 0.6m, and 0.8m lengths, providing flexibility in your light installation. Add a touch of style with our shades available in black, white, or firetruck red, and choose from a variety of shapes - beehive, cylinder, rectangle, or round lantern - to customise your lighting design.


Why We Prefer Warm White
At Flexible Neon, we prefer warm white lighting for several compelling reasons. Warm white light offers a softer, more natural glow that closely resembles traditional incandescent lighting, creating a welcoming and cosy ambience in any space. Here are some key reasons why warm white is our top choice:
-
Comfort and Relaxation: Warm white light has a colour temperature typically ranging from 2700K to 3500K, which emits a gentle, calming glow that promotes relaxation. It's ideal for areas where people gather, such as living rooms, bedrooms, and dining spaces.
-
Enhancing Decor: Warm white light complements various interior designs and colour schemes, enhancing the aesthetic appeal of your space. It creates a harmonious atmosphere that suits both modern and classic settings.
-
Aesthetic Appeal: Warm white light is often preferred for its flattering effect on skin tones, making it an excellent choice for retail and hospitality spaces, as well as photography studios.
-
Cosy Ambience: Whether it's in a restaurant, café, or residential setting, warm white lighting helps to create a cosy and inviting environment that encourages social interaction and relaxation.
-
Versatility: Warm white lighting is incredibly versatile and can be used in various applications, such as accent lighting, cove lighting, or general room illumination.
-
Well-Being: Warm white light has been associated with improved mood and overall well-being. It is considered more soothing and less disruptive to circadian rhythms than cool white or daylight lighting.
-
Subtle and Stylish: Warm white light adds a touch of elegance and sophistication to any space, making it an excellent choice for creating a warm and inviting atmosphere.
At Flexible Neon, we prioritise the well-being and satisfaction of our customers. We believe that warm white lighting enhances the overall experience and comfort in any environment, making it a preferred option for a wide range of lighting projects. With our extensive collection of warm white LED products, we are committed to helping you achieve the perfect lighting solution that meets your specific needs and preferences.
Guide: How Pixel LED's Work
Pixel LED's, also known as addressable LED's or smart LED's, are a fascinating type of light-emitting diode that allows individual control over each LED in a strip or matrix. They have revolutionised the world of lighting, enabling dynamic and mesmerising visual effects. Here's a comprehensive guide on how pixel LED's work:
1. Basic Structure: Pixel LED's consist of three main components: the RGB LED chip, a controller, and a driver. The RGB LED chip contains three individual LEDs - red, green, and blue - all integrated into one package. The controller is the brain that processes data and sends signals to each LED. The driver provides the necessary power and voltage regulation for the LED's to operate efficiently.
2. Addressing Each Pixel: Unlike conventional LED's, which are all controlled together as a single unit, pixel LED's can be individually addressed. Each LED in the strip or matrix has its unique address, allowing the controller to command specific LED's to turn on, off, or change colours independently.
3. Communication Protocols: Pixel LED's use various communication protocols to receive data from the controller. Flexible Neon mainly uses the SMD5050 but other common ones include WS2812, APA102, SK6812, and WS2813. These protocols enable data transmission through a single data wire, making it easy to control large numbers of LED's in long chains or grids.
4. Colour Mixing: By varying the intensity of the red, green, and blue LED's in each pixel, pixel LED's can produce a wide range of colours. This colour mixing capability enables the creation of intricate and dynamic lighting effects, from smooth gradients to animated patterns.
5. Control Methods: We employ a custom controller system for all our pixel needs at Flexible Neon. If you require assistance with setup, feel free to reach out to us. Pixel LED's can be controlled using microcontrollers or a dedicated LED controller. The microcontroller processes the desired lighting patterns and sends data to the LED strip or matrix using the appropriate communication protocol.
6. Power Requirements: Since each LED in a pixel LED strip requires power, it's essential to ensure that the power supply can handle the total power consumption of all LED's simultaneously displaying their brightest colours. Power injection might be necessary for longer strips or matrices to prevent voltage drop and maintain consistent brightness across all pixels.
7. Programming and Effects: To achieve stunning lighting effects, programming plays a crucial role. Users can code their own patterns or take advantage of Flexible Neon's pixel controller which has, intricate animations, colour-changing effects, and even responsive lighting that reacts to sound or environmental changes.
8. Applications: Pixel LED's have a wide range of applications, including stage lighting, art installations, architectural lighting, signage, home automation, and digital art. Their ability to create captivating visuals and easily adapt to various designs makes them a popular choice in the lighting industry.
Conclusion: Pixel LED's have transformed lighting possibilities, enabling intricate, dynamic, and mesmerising effects that were once unimaginable. With individual addressability and a wide range of colour options, these smart LED's provide endless creative opportunities for designers, artists, and enthusiasts alike. Whether for artistic expression, commercial displays, or home projects, pixel LED's continue to redefine the way we illuminate our surroundings and captivate our senses.


Guide: Different White Colour Temperatures
Colour temperature is a measure of the colour appearance of light, which is expressed in Kelvin (K). The colour temperature of white light refers to the warmth or coolness of the light emitted by a source. Lower colour temperatures (1800K-2700K) are considered warm white, while higher colour temperatures (3500K-6500K) are considered cool white.
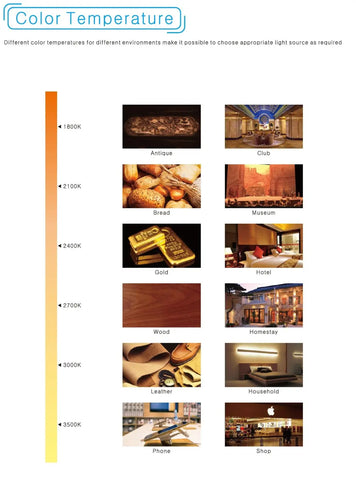
1800K-2000K: These colour temperatures emit a very warm, yellowish light that is similar to the light emitted by candle flames. This type of light is often used for decorative purposes or to create a cosy and intimate atmosphere in a room. Examples include restaurants, bars, and hotel lobbies that aim to create a relaxed and comfortable ambience. These colour temperatures can also be used in outdoor lighting, such as string lights, to create a warm and inviting atmosphere.
2400K-2700K: These colour temperatures emit a warm white light that resembles the colour of traditional incandescent bulbs. They are often used in residential lighting, such as living rooms, bedrooms, and dining rooms. These environments typically require a warm, comfortable atmosphere. These colour temperatures are also used in restaurants and bars to create a cosy and inviting atmosphere.
3000K: This colour temperature emits a slightly yellowish, warm white light that is commonly used in both residential and commercial lighting. It is often used in kitchens, bathrooms, and offices where a comfortable and relaxing environment is desired. This type of light is also suitable for retail environments, such as clothing stores, where warm lighting can make customers feel comfortable and encourage them to stay longer.
3500K: This colour temperature emits a neutral white light that is often used in commercial settings. It has a slightly yellowish tint, but it is not as intense as lower colour temperatures. Examples of applications include retail stores, hospitals, and schools where a bright, clean environment is desired. This type of light is also used in office environments where workers need to stay alert and focused.
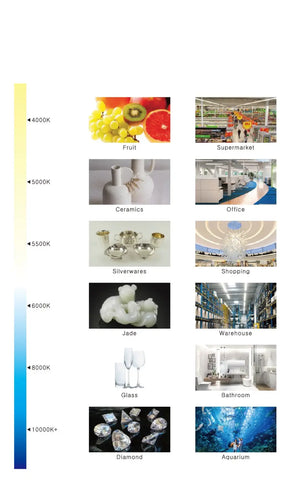
4000K: This colour temperature emits a cool white light with a slight bluish tint. It is commonly used in commercial and industrial settings, such as factories, warehouses, and workshops, where a bright and efficient workspace is desired. This type of light is also suitable for hospitals, laboratories, and other environments where a clean, bright light is needed to perform tasks accurately.
5000K: This colour temperature emits a cool white light that simulates natural daylight. It is often used in offices, hospitals, and schools where a bright and energetic atmosphere is needed. This type of light is also commonly used for outdoor lighting, such as streetlights and parking lots. The high level of brightness provided by this colour temperature makes it an excellent choice for sports facilities.
6500K: This colour temperature emits a very cool, bluish light and is commonly used in applications that require high levels of illumination, such as sports arenas and outdoor lighting. It is also commonly used in industrial and commercial settings where precise work is required, such as in medical labs and clean rooms. This type of light is not suitable for residential settings as it can create a harsh and unwelcoming atmosphere.
In general, the appropriate colour temperature for a given application depends on the specific needs of the user and the environment in which the light will be used. For example, in a residential setting, warmer colour temperatures (2400K-2700K) create a warm and comfortable atmosphere, while cooler colour temperatures (4000K-5000K) are often used in commercial and industrial settings where a bright and efficient workspace is needed. In addition, the choice of colour temperature should also take into account the colour rendering index (CRI), which measures how accurately a light source reproduces colours compared to natural light. A higher CRI is desirable in applications where colour accuracy is important, such as art galleries, clothing stores, and makeup studios.
It is worth noting that the same colour temperature can appear differently depending on the context and surrounding colours. For example, a warm white light (2700K) can appear yellowish in a room with yellow walls, but it may appear more neutral in a room with white walls. Therefore, it is important to consider the overall colour scheme of a space when selecting the appropriate colour temperature.
In conclusion, understanding the different colour temperatures of white light and their characteristics can help users select the appropriate lighting for their needs. Whether it is for creating a cosy and intimate atmosphere in a home or providing bright and efficient lighting in a commercial or industrial setting, choosing the right colour temperature is essential for achieving the desired effect.


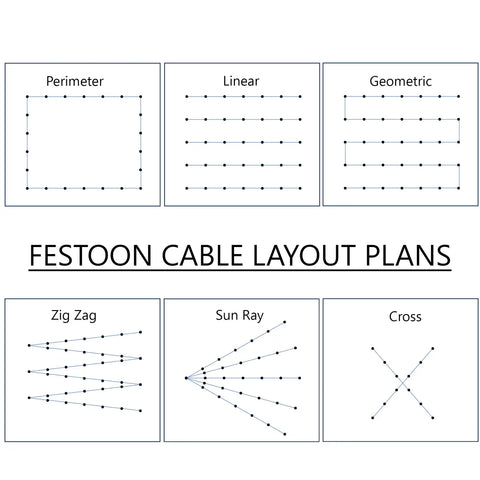
Guide: How to Hang Our Commercial Festoon Cable
Step 1: Choose the Location and Plan the Layout
The first step in hanging commercial festoon cable is to determine the location and plan the layout. Start by deciding where you want to hang the cable and how many lights you need. Then, measure the distance between the anchor points and calculate the length of cable required.
Step 2: Gather Materials and Tools
Before you start, gather all the necessary materials and tools. You will need the following:
Festoon cable
Light bulbs
Cable ties or clips
Screw hooks or eye bolts
Pliers or wire cutters
Ladder or scaffolding (depending on the height of the installation)
2 Core Lead Wire
Cable connectors (depending on the type of cable you are using)
Step 3: Attach the Screw Hooks or Eye Bolts
Using a ladder or scaffolding, attach the screw hooks or eye bolts to the anchor points. Make sure they are securely fastened and can support the weight of the cable and lights.
Step 4: Install the Festoon Cable
Once the screw hooks or eye bolts are in place, it's time to install the festoon cable. Start at one end and work your way to the other, securing the cable to each anchor point with cable ties or clips. Make sure the cable is taut and doesn't sag in the middle.
Step 5: Attach the Light Bulbs
Now that the cable is in place, it's time to attach the light bulbs. Screw each bulb into the socket and make sure it's secure.
Step 6: Connect the Cable to Power via 24V Transformer.
Once all the light bulbs are in place, it's time to connect the cable to power via a 24V transformer. Before connecting the cable, make sure the transformer is rated for the wattage of the festoon lights you're using (See the relevant guide).
To connect the cable to the transformer, you may need to use WAGO’s or ask us to put an easy plug system to join the cable to the transformer. Make sure the connection is secure and safe, and follow the manufacturer's instructions for the transformer.
Note that it's important to use a transformer when connecting festoon lights to power, as the lights are typically designed to run on low voltage (24V) for safety reasons. Without a transformer, you risk electrical shock or damage to the lights.
Step 7: Test the Lights
Before you finish, test the lights to make sure they are working properly. Turn on the power and check each light bulb to make sure it's working.
Step 8: Secure the Cable and Clean Up
Finally, secure the cable and clean up any mess you made during the installation. Use cable ties or clips to make sure the cable is secure and won't come loose over time. Dispose of any packaging or debris and enjoy your new festoon lights!
Overall, hanging commercial festoon cable can be a great way to add ambience and lighting to any outdoor or indoor space. With the right tools and a little planning, it's a straightforward process that can be completed by anyone.


What is IP Rating


Guide: How To Choose the Right LED Power Supply
Why do you need an LED power supply?
Because most of our LED strips work at low voltage 12Vdc or 24Vdc, We can’t directly connect the LED strip to the mains 110Vac or 220Vac, which will damage the LED strip. Therefore, we need an LED power supply, also called an LED transformer, to convert the commercial power into the corresponding voltage required by the LED strip, 12Vdc or 24Vdc.
Factors you need to consider
Finding the correct LED power supply for LED strips is not an easy task. There are many factors to consider when picking the most suitable LED power supply, and you need to know some basic LED power supply knowledge.
Constant voltage or constant current LED power supply?
What is a constant voltage LED power supply?
Constant voltage LED drivers typically have a fixed voltage rating of 5 V, 12 V, 24 V, or some other voltage rating with a range of current or maximum current.
All our LED strips must be used with a constant voltage power supply.
What is a constant current LED power supply?
Constant current LED drivers will have similar ratings but be given a fixed amp (A) or milliamp (mA) value with a range of voltages or maximum voltage.
Constant current power supplies generally cannot be used with LED strips. Because the current of the constant current power supply is fixed, the current will change after the LED strip is cut or connected.
Wattage
You need to find out how many watts the LED light will consume. If you wish to run more than one light with one power supply, you must add the wattages to find the total wattage used. Ensure you have a big enough power supply by giving yourself a 20% buffer of the total wattage calculated from the LEDs. This can quickly be done by multiplying the total wattage by 1.2 and then finding a power supply rated for that wattage.
For example, if you have two rolls of LED strips, each roll is 5 meters, and the power is 14.4W/m, then the total power is 14.4*5*2=144W.
Then the minimum wattage of the power supply you need is 144*1.2=172.8W.
Voltage
You need to ensure that your LED power supply’s input and output voltage are correct.
Input voltage
The input voltage is related to which country the power supply is used.
The mains voltage in Australia is 240V.
But some LED power supplies are full voltage range input, which means this power supply can be used in any country worldwide.
Output voltage
The output voltage needs to be the same as your LED strip voltage.
If the output voltage exceeds the LED strip power supply, it will damage the LED strip and may cause a fire.
Dimmable
All of our LED strips are PWM dimmable, and if you need to adjust their brightness, you must ensure your power supply has the dimming capability. The data sheet for the power supply will state whether it can be dimmed and what type of dimming control is used.
Common dimming methods are as follows:
- 0/1-10V Dimming
- TRIAC Dimming
- DALI Dimming
- DMX512 Dimming
Temperature and waterproof
An essential factor that cannot be ignored when choosing a power supply is the use area and use environment. The power supply operates most efficiently if used within its temperature parameters. Power supply specifications should include a safe operating temperature range. It’s best to work within this range and ensure you don’t plug it in where heat can build up and exceed the maximum operating temperature. It’s usually a bad idea to plug a power supply in a cubicle that doesn’t have a ventilation system. This will allow even the smallest heat source to build up over time, ultimately cooking power. So ensure the area isn’t too hot or too cold, and the heat doesn’t build up to damaging levels.
Each LED power supply is marked with an IP rating.
An IP rating, or Ingress Protection Rating, is a number assigned to an LED driver to indicate the level of protection it offers against solid foreign objects and liquids. The rating is typically represented by two numbers, the first showing the protection against solid objects and the second against liquids. For example, an IP68 rating means the equipment is completely protected against dust ingress and can be submerged in water up to 1.5 meters for up to 30 minutes.
If you need to use the LED power supply outdoors where it is exposed to rain, please select an LED power supply with an appropriate IP rating.
Efficiency
Another critical characteristic in choosing an LED driver is efficiency. Efficiency, expressed as a percentage, tells you how much input power the driver can use to power the LEDs. Typical efficiencies range from 80-85%, but UL Class 1 drivers that can operate more LEDs are typically more efficient.
Power factor
The power factor rating is the ratio of real power (Watts) used by the load compared to apparent power (Voltage x Current drawn) into the circuit: Power factor = Watts / (Volts x Amps). The power factor value is calculated by dividing real power and apparent value.
The range for power factor is between -1 and 1. The closer to 1 the power factor is, the more efficient the driver is.
Size
When choosing a power supply for your LED project, it’s essential to know where it needs to be installed. If you want to put it inside the product you are making, it has to be small enough to fit in the space provided. If it’s outside the app, there should be a way to mount it nearby. A wide variety of power supplies are available in different sizes and shapes to suit your needs.
Class I or II LED driver
Class I LED drivers have basic insulation and must include a protective ground connection to reduce the risk of electric shock. Their safety is achieved through the use of basic insulation. It also provides a means of connecting to a protective grounding conductor in the building and connecting these conductive parts to the earth if the basic insulation fails, which would otherwise generate a dangerous voltage.
Class II LED drivers not only rely on basic insulation to prevent electric shock but must also provide additional safety measures, such as double insulation or reinforced insulation. It does not depend on either the protective ground or the installation conditions.
Safety protection function
For safety reasons, LED power supplies should have protection features such as over-current, over-temperature, short-circuit, and open-circuit. These safety measures lead to a faulty power supply shutdown. These protection features are not mandatory. However, if you want to use it safely in case of problems, you should only install power supplies with these protection features.
UL listed certification
LED power supply with UL certification means better safety and better quality.
Also, some projects require the LED power supply to have UL certification.
How to connect LED strip lights to the power supply?
After choosing the right LED strip power supply, we connect the red and black wires of the LED strip to the corresponding terminals or leads of the power supply, respectively. Here we need to pay attention to the positive and negative terminals of the strip. They must correspond to the positive and negative poles of the power supply output. (The symbol + or +V indicates the red wire; the mark – or -V or COM indicates the black wire).
Can I connect many LED strips to the same LED power supply?
Yes, you can. But make sure that the wattage of the LED power supply is sufficient, and make sure that the LED strips are connected to the LED power supply in parallel to reduce the voltage drop.
How far can I install an LED tape from its LED power supply?
The further away your LED strip is from the power source, the more noticeable the voltage drop will be. If you’re using long cables from the power supply to the LED strips, make sure those cables are made of thick copper and use as large-gauge cables as possible to help minimize voltage loss.
Tips for installing LED power supply
LED drivers, like most electronics, are susceptible to moisture and temperature. You need to install the LED driver in a dry location with plenty of air and good ventilation to maintain its reliability. Proper mounting is critical for air circulation and heat transfer. This will ensure optimal performance and long life.
Leave your LED power supply some spare wattage
Make sure you do not consume the entire capacity of the power supply. Leave some room to use only 80% of your driver’s maximum power rating. Doing so ensures that it will not always run at full power and avoids premature heating.
Avoid overheating
Ensure that the LED power supply is installed in a ventilated environment. This is beneficial to the air to help the power supply to dissipate heat and ensure that the power supply works to a suitable ambient temperature.
Minimize the “on” time of the LED power supply
Install a switch at the mains input end of the LED power supply. When lighting is not required, disconnect the switch to ensure that the LED power supply is truly off.
Troubleshooting common LED power supply issues
Always ensure correct wiring
Before applying power, the wiring needs to be checked in detail. Incorrect wiring may cause permanent damage to the LED power supply and LED strip.
Make sure the voltage is correct
You must ensure the LED power supply’s input and output voltages are correct. Otherwise, the incorrect input voltage may damage the LED power supply. And the wrong output voltage will damage the LED strip.
Make sure that the LED power wattage is sufficient
When the LED power supply wattage is insufficient, the LED power supply may be damaged. Some LED power supplies with overload protection will automatically turn off and on. You may see the LED strip constantly turn on and off (flicking).


Guide: Everything You Need To Know About Beam Angle
What Exactly Is Beam Angle?
Light is made up of tiny particles known as “photons,” when these photons are emitted, they have a certain trajectory. The angle that this trajectory makes is called the “Beam Angle.” The mechanism by which photons are produced varies in different light sources. Hence, the beam angle of the different lights also varies.
The beam angles are divided into several categories. They range from very narrow to very wide. Lights with broader beam angles spread wide. In contrast, the narrower beams have a lesser spread. Furthermore, the beam angle also impacts light intensity because it depends on the overall spread. A light that spreads more will be less intensive than that that has a narrower spread.
The light required to light up a space depends on its area and the preferred light source. It is expressed in the lumen and describes the intensity of the light. The point is a larger size would require more lumens than a narrower one. Hence, the light source should have a beam angle that spreads narrowly to brighten the entire space.
The following tables tell the light spread based on its beam angle based on NEMA. National Electrical Manufacturer Association, or NEMA, is one of the most credible associations of electrical equipment manufacturing companies. And the classification of beam angle by NEMA is widely used in the industry.
Most reputed light manufacturers provide information on the beam angle of their products. You can check for it and compare it with the provided table to know the kind of spread it will have.
How Does Beam Angle Affect Lighting Conditions?
Beam angle affects the lighting conditions of space by impacting the spread of the light. For instance, two LED lights produce 600 lumens but have different beam spreads. The one with a broader beam angle would brighten up more area than the narrower one.
However, while the wider beam angle would provide more spread, the light would not have a high intensity. It is because photons spread over a larger area, dividing the intensity in a large area. In contrast, the narrower beam angle would not produce as much spread, but it will be more intense. Again, a narrower beam would concentrate the photons in a more limited region.
Different spaces in homes and offices have varying lighting requirements. For example, some areas require intense light to enhance the utility, while others need a better spread. Therefore, you should select a beam angle based on the utility and the lighting requirement of a particular space.
Role of Beam Angle in Different Types of Lighting
Each area has different lighting requirements, divided into three main categories. These include basic lighting, accent lighting, and decorative lighting.
Basic Lighting
Basic lighting is the most common and widely used in all spaces. You often see such lighting in living rooms, bedrooms, garages, and bathrooms. It strikes a balance between intensity and spread. Typically, the basic lighting covers the entire space with enough intensity to provide decent utility. The beam angle for such lights ranges from 120 to 90 degrees, depending on the size of the area.
Accent Lighting
Accent lighting highlight a particular area in a space. For example, you can use it to brighten up the living room’s seating area or highlight the walls’ colour. Because it does not require a wider spread, you can use light with narrower beam angles. Lights with such a beam angle light up only a selected area and provide profound intensity. Typically, you use Medium Narrow or Narrow beam angles for accent lighting.
Decorative Lighting
Decorative lighting, as the name suggests, is used for decoration. For example, you can use them to highlight a decoration piece or install different coloured lights in some parts of the homes. Typically, narrow and very narrow light beams are used for this purpose. These lights do not have to brighten up a large space but a narrow region. And the narrower angles provide exactly that while offering more intensity.
Applications of Different Beam Angles
Since different beam angles produce different light styles, their applications also vary. So let’s take a look at them.
Narrow Beam
A narrow beam angle covers a smaller area but provides more intense light. Such light angles work best for case closets and small kitchens and highlight certain houses’ areas. In commercial spaces, you should prefer it for warehouses and accent lighting tables in restaurants. However, while using these lights in the warehouse, remember that you will get little coverage. Hence, you would need multiple lights to get proper lighting.
Medium
A medium angle strikes a balance between intensity and coverage. Hence, these lights work best in living areas in domestic spaces. However, you can prefer them for ambient lighting in clothing stores in commercial spaces.
Wide
Wide angle has a broader spread and is used to light outdoor spaces. For example, you can use it in a home patio space to provide ambient light to a large commercial store.
Very Wide
Such a beam angle aims to spread the light as far as possible. Hence, these are typically used outdoors in floodlights and street lamps.
How To Select The Right Beam Angle?
Now that you know the impact of beam angle on the lighting conditions, you must also know that several factors determine the right beam angles. You must consider the following factor to select the right beam angle for a particular space. Let’s take a look at them:
Type of Building
The first thing that you should take into account is the type of building. You have to be aware of the space’s size, the ceiling’s height, and the required number of fixtures. If a room has a high ceiling and a shorter area, it would need a lesser number of fixtures. Furthermore, the narrower beam for such spaces would work better because not much spread is required.
In contrast, a building with a wider area and a lower ceiling would be better off with a broader beam angle. Selecting a narrow beam angle for such spaces creates less spread which would not be enough to light up the entire area.
Most buildings have ceiling heights of about 7.9 to 8.9 feet. Lights with a wider angle of 60 degrees will work for such structures. However, if the ceiling is higher than 8.9 feet, you would need multiple lights. And it would help if you chose a narrower beam angle to provide adequate lumens.
Number of Lights
The area of different spaces varies, thus the number of lights required to brighten it up. It is also an essential factor that you should consider when selecting a beam angle. If space requires two or more lights, the beam angle for each one would have to be estimated separately.
You would have to devise a lighting plan and assign a portion of the area to each light source. That particular light source should have a beam angle that covers the entire area and provides adequate lumens.
Not all portions of the space need to have the same area. Hence, the requirement for each part can vary. The point is you cannot select an optimal beam angle based on the calculation of a single portion.
Another critical point is that all the light beams in a single space must overlap. Otherwise, there will be areas that receive no light and will be darker.
Different LED Lights
Once you have noted down the lighting requirements of the space, you would have to pick between several LED types. Each of these types offers a different beam angle which you should consider before purchasing them. The beam angle of a LED might vary within its category, but the following table shows general beam angles of different categories.
Right Beam Angles For Different Spaces
Now that we have covered the basics of beam lights, let’s move on to the lighting requirements of different spaces. Generally, we can divide light styles into two categories, domestic and commercial. The two types have different applications; hence, the appropriate beam angles also vary. So, let’s take a look at them.
Residential Buildings
Residential buildings have lower ceilings and square areas than commercial properties. Furthermore, the lighting requirements mostly stay the same for the houses and apartments. Hence, you can use the same beam angle in both spaces. For most domestic spaces, the beam angle of 40-60 degrees would work the best. This angle will cover the entire space area, including a bedroom, kitchen, and bathroom.
However, the living rooms generally have a larger area, so it needs more spread than the other spaces in a house. Hence, it would be best if you chose anything above 60 degrees to light up the living room. The calculation might vary based on the factors discussed in the earlier section.
In addition to covering the significant spaces, specific components such as staircases, closets, and kitchen cabinets also have lighting requirements. Because the light in such areas has to cover a narrower region, a narrower angle of about 25 degrees is ideal for them.
Commercial Buildings
Commercial buildings have several types, and the lighting requirements for each class vary significantly. Hence, we have divided them into the following sub-categories.
Offices
Workspaces like offices need intense lighting in all of their areas to ensure that the space of every employee is well-lit. It is imperative in workplaces where employees spend most of their time on laptops and desktops. Poor lighting conditions around the desk can cause strain on the eyes, which can decrease productivity. Such spaces benefit the best from lights with narrower beam angles to provide more intensity. However, you must install more lights to cover the entire area.
Warehouses
Warehouses typically have higher ceilings than other Commercial spaces. A wider beam angle would not help because light would not reach down because of low intensity. You should use a narrower beam and install multiple lights to brighten a warehouse. However, the wider beam can also be opted for only when you install the lights into walls instead of ceilings.
Retail Stores
The purpose of lighting in retail stores is not just to provide adequate brightness in the space but also to showcase products. Hence, it requires brighter and more intense light, which narrower beams can achieve. You can use a combination of light beams to provide optimal light in the entire store.
For example, the wider beam can be used in ceilings to cover the whole store. In contrast, you can use very narrow beams, such as 10 degrees in racks, to highlight the products.
Restaurants
Most restaurants open up in the evening, and the purpose of lighting in such spaces is to highlight the aesthetics. You should use narrower beam light in these spaces but be mindful that they should be somewhat light. A daylight environment within a restaurant would not work well. Furthermore, very narrow beams, such as 10 to 25, can be used to highlight the restaurant’s decor.


Guide: LED Drivers
At Flexible Neon, we believe in delivering the highest quality products to our valued customers, which is why we exclusively use Meanwell LED drivers in our lighting solutions. Meanwell is renowned for its exceptional reliability, efficiency, and performance, making it a trusted brand in the industry. By using Meanwell LED drivers, we ensure that our lighting systems operate with maximum efficiency and longevity. These drivers are designed to provide stable and precise voltage regulation, ensuring consistent and flicker-free illumination. Additionally, Meanwell LED drivers are known for their advanced safety features, protecting both the LED lights and the overall electrical system. With Meanwell's proven track record of excellence, we can confidently offer lighting solutions that meet the highest standards of quality, durability, and safety to our valued clients.
As energy laws have gotten stricter, most people know that LEDs, or light-emitting diodes, last a long time and save energy. Few people understand that these high-tech light sources can’t work without an LED driver. A LED driver also known as a transformer or LED power supplies, are like ballasts for fluorescent lights or transformers for low-voltage products such as Bulbs or Flexible Neon. They give LEDs the electricity they need to run and work at their best, although not all products seen are low voltage.
What Is an LED Driver?
An LED driver controls how much power an LED or a group of LEDs needs. Since light-emitting diodes are low-energy lighting devices with long life and low energy uses, they need a specialised power source.
The main jobs of LED drivers are to provide low voltage and protect LEDs. Each LED can use up to 30mA of current and work at voltages of about 1.5V to 3.5V. Multiple LEDs can be used in series or groups to make home lighting, which may need a total voltage of 12 to 24 V DC. The LED driver turns the AC around to meet the needs and lowers the voltage. This means that the high AC mains voltage, which ranges from 120V to 230V, must be changed into the low DC voltage that is needed.
The LED drivers also protect the LEDs from changes in voltage and current. Even if the mains supply changes, the circuits ensure that the voltage and current going to the LEDs stay in the suitable range for them to work. The protection stops the LEDs from getting too much voltage and current, which would hurt them, or have insufficient current, making them less bright.
How Do LED Drivers Work?
When the temperature of an LED changes, so does the forward voltage needs. As it gets hotter, less voltage is needed to move current through the LED, so it uses more power. Thermal runaway is when the temperature goes up out of control and burns out an LED. The power output levels on LED drivers are made to meet the needs of LEDs. The driver’s constant current keeps the temperature stable by responding to changes in the forward voltage.
What Is an LED Driver Used For?
Transformers for low-voltage lighting products do the same thing that LED drivers do for LEDs. LED lights are low-voltage devices that usually run on 4V, 12V, or 24V (note Flexible Neon only uses 12V and 24V). To work, they need a source of direct current power But because the wall sockets power supplies typically have a much higher Voltage (220V in Australia) and produce alternating current, they are not directly compatible. Since the average voltage of an LED is too low for a regular transformer, special LED drivers are used to convert high-voltage alternating current to low-voltage direct current.
LED drivers also protect against power surges, and changes, which can make temperatures rise and light output go down. LEDs are made to only work within a specific range of amps.
Various Dimensions to Describe LED Drivers.
External vs. Internal LED Driver
Differences between external and internal LED drivers can be built into lamps (interior), put on the surfaces of light fixtures, or even be paced outside of them (External). Most low-power indoor lights, especially bulbs, have LED drivers built in. This makes the lights cheaper and more attractive. On the other hand, downlights and panel lights usually have LED drivers on the outside.
When using a lot of power, like streetlights, floodlights, stadium lights, and grow lights, external LED drivers are used more and more. This is because the heat inside the lights gets worse as the power goes up.
All of Flexible Neon’s product range are Meanwell drivers which are all exterior to work with all of our products and allow different products to run off the same transformer. This method also allows easier access for maintenance.
Switching Power Supply vs. Linear Regulator
Because linear LED drivers are so simple, a resistor, a controlled MOSFET, or an IC may be all needed to make an LED’s constant current. A lot of AC LED, sign, and strip applications use them. Because of this, power supplies can change very easily, and there are now a considerable number of constant voltage power sources, such as 12V and 24V LED drivers. A linear regulator wastes a lot of power, so the light can’t be as bright as it could be with a switching power supply.
High efficiency switching supplies naturally lead to high light efficacy, which is the most important thing for most light applications. Also, switching power supplies flicker less, have a higher power factor, and can handle surges better than AC LEDs.
Isolated LED Drivers vs. Non-Isolated LED Drivers
When we compare these two things, we call each of them a switching power supply. According to UL and CE regulations, the isolated design usually works at 4Vin+2000V and 3750Vac, and the input and output voltages are well separated. Using a highly insulated transformer instead of an inductor as the part that transfers human power makes the system safer. Still, it also makes it less efficient (by 5%) and more expensive (by 50%). Insulation keeps the high voltage from going from the input to the output. On the other hand, low-power built-in designs usually use non-isolated designs.
Constant Voltage vs. Constant Current LED Driver
Because LEDs have unique V-I characteristics, it goes without saying that a constant current source should power them. However, a constant voltage LED driver can be used if a linear regulator or resistor is connected in series with the LED to limit the current. Signs and strip lighting usually use constant voltage LED drivers with 12V, 24V, or even 48V because they are much more efficient than constant current LED drivers, which is the norm for general lighting like bulbs, linear lights, downlights, streetlights, etc. If the total wattage doesn’t exceed the power supply’s limit, the constant voltage solution makes it easier for users to change the amount of light, giving it much flexibility for installation in the field.
Dimmable vs. Non-Dimmable LED Driver
In this new time, every light is made to be dim. This is a big subject because there are many ways to dim lights. Let’s talk about each one in turn.
1) 0-10V/1-10V dimming LED Driver
2) PWM dimming LED Driver
3) Triac dimming LED Driver
4) DALI dimming LED Driver
5) DMX dimming LED Driver
6) Other Protocols of LED Driver
Waterproof vs. Non-Waterproof LED Driver
Flexible Neon recognises the IP (ingress protection) certification as the only way to classify the degree to which LED drivers are waterproof. The IP code is made up of two numbers. The first number rates the protection against solid objects on a scale from 0 (no protection) to 6 (no entry of dust), and the second number rates the protection against liquids on a scale from 0 (no protection) to 7. (8 and 9) don’t come up very often in the lighting business. LED drivers with IP20 ratings or lower are used inside, while waterproof drivers are used outside. But this doesn’t always happen. For example, some indoor applications use waterproof LED drivers because they can put out much more power than low IP ones without needing an active cooling system, making them last less than IP-rated LED drivers.
How To Use an LED Driver?
Instructions for setting up LED drivers
- Make sure your LED driver works with both the LED systems you want to connect it to and the power source you want to use. Both the Amperage and Voltage ratings must be the same (for knowing how many Amps can be used on a driver, please see the guide)
- Make sure the driver won’t have to deal with problems in the environment that it wasn’t made to handle. For example, if you want to put LEDs outside, ensure the driver can handle water well enough.
- Once you know which wires are positive and negative, you can unplug your socket from the grid.
- Connect the positive and negative wires from the power socket to the positive and negative terminals on the driver. This can be done with ease using WAGO’s!
- Check the installation carefully to ensure that all the connections are tight and in the right place and that heat is not building up. If something goes wrong, turn off the power and figure out what’s wrong.
Factors To Consider Before Choosing an LED Driver
DC Dimming
Would you like LEDs to be less bright? Or do you plan to change how bright it is? Then choose a dimmable driver or power supply. Why? The power sources are easy to tell apart because of how they work. The specifications table also has extra information, like what kinds of dimmer controls can be used with the drivers.
Power Requirements
One of the first things to consider is how much voltage your lamp needs. So, if your LED needs 20 volts to work, you should buy a 20-volt driver.
In short, the goal is to ensure that your driver gets the right amount of power. The general rule is that you should do your job within the range of the light.
For a constant-voltage driver, you can also think about the voltage range. But you can measure both voltage and current ranges with a constant-current driver.
Pay attention to how much voltage the proposed LED light will use. So, ensure the LED driver can handle the voltage from the LED. In this way, it is easy to step down to the needed output voltage.
Also, you should think about watts. During this process, make sure to buy a driver with a higher maximum wattage than the light.
Power Factor
The power factor helps determine how much power the driver uses from the electrical network. And the range is usually from -1 to 1. Since this is the case, a power factor of 0.9 or more is the norm. In other words, as the number gets closer to one, the driver works better.
Safety
Your LED drivers should meet several different standards. For example, we have UL classes 1 and 2. Use the UL Class 1 for drivers that put out a lot of voltage. The fixture needs to be set up safely for drivers in this group. It can also hold more LEDs, which makes it work more efficiently.
At the level of LEDs, the UL Class 2 drivers don’t need a lot of safety features. It also meets the standards set by UL1310. Even though this class is safer, it can only run a certain number of LEDs at a time.
The IP rating is another way to measure how safe a driver’s cage is and what it can do. If you see IP67, for example, it means that the driver is safe from dust and brief immersion in water.
Efficiency
This part is crucial because it shows how much power the LED driver needs. The value is shown in terms of percentages. So, you could expect it to work between 80% and 85% of the time.
Benefits Of an LED Driver
Low voltages of 12 to 24 volts power LEDs with direct current. So, even if your AC voltage is high, between 120 and 277 volts, an LED driver will change the direction of the current. In other words, stepping down from alternating to direct current is helpful. You can even find the right amount of high and low voltage.
LED drivers keep LEDs safe from changes in voltage or current. If the voltage of an LED changes, the current supply may change. Because of this, LED lights’ output is inversely related to how many they have. LEDs are also only supposed to work within a specific range. So, too little or too much current will change how much light comes out or cause the LED to break quickly because it gets too hot.
Overall, LED drivers have two main benefits:
- Changing from AC to DC.
- The drivers help ensure that a circuit’s current or the voltage doesn’t drop below its rated level.
LED Driver Types
Constant-Current
This LED driver only needs a fixed amount of output current and a range of output voltages. Constant current is a specific output current measured in milliamps or amps and has a range of voltages that change depending on how much the LED is being used (its wattage or load).
Constant-Voltage
Constant-voltage LED drivers have a constant output voltage and a maximum output current. The LED module also has a regulated current system that a simple resistor or an internal constant-current driver can power.
They only need a single steady voltage, usually 12 or 24 volts DC.
LED Drivers For AC
Theoretically, this LED driver could run halogen or incandescent lights with low voltage. But standard transformers can’t be used with AC LED drivers because they can’t tell when the voltage is low. So, they have transformers that don’t have a minimum load.
Dimmable LED Drivers
With these LED drivers, you can dim your LED lights. It also lets you control the brightness of LEDs with a constant voltage. And it does this by reducing the amount of current that goes to the LED light before it turns on.
Applications Of LED Drivers
Automotive LED Drivers
With high-quality automotive LED drivers, you can tell the difference between your car’s inside and outside lighting systems in many ways:
- The group of headlights
- infotainment
- Interior and rear lighting
Backlight LED Drivers
LCD backlight LED drivers often use a specific dimming scheme to control the backlight’s brightness.
Illumination LED Drivers
You can set up your devices with LED drivers to have infrared lighting. It can also be done with the help of a multi-topology constant-current controller.
RGB LED Drivers
With RGB LED drivers, you can add an animation or an indicator to your LED arrays with more than one colour. Also, they often work with many standard interfaces.
Driver for LED displays
With the help of LED display drivers, you can control which LED strings use the least and most power. So, these drivers can be used with either a large narrow pixel or a matrix solution for small or mini LED digital signage applications.
What LED Driver Do I Need?
To figure out what size LED driver will meet your needs, you need to know the following:
- The voltage of the mains power that you’ll be using
- The total amount of power that the system’s LEDs use
- What kind of voltage or constant current do the LEDs need
If there are any other technical factors, like the need for precise colour control or the possibility of water exposure, that can affect how the LED drivers work. The LED’s IP rating shows how resistant it is to water; a higher rating means it is more resistant. With an IP rating of 44, the product can be used in kitchens and other places where water might occasionally splash on it. A driver with a high IP rating, like 67, can be used outside. Drivers with an IP rating of 20 should only be used inside, where it’s dry.


