


Do LEDs Last Longer with Better Quality Drivers?
Discover why high-quality LED drivers are essential for LED longevity. Flexible Neon supplies only ELG and HLG Mean Well drivers — ensuring your lighting performs at its best and lasts longer.


Transform Your Space with Festoon Lighting: A Bright Adventure Awaits
Discover the magic of festoon lighting and transform any space into a vibrant haven. Dive into our guide for creative ideas, tips, and insights to light up your life, literally!


Brighten Your World: Dive Into the World of Customisable LED Lighting
Discover the versatility of customisable LED lighting, including Neon LED Strips, Festoon Lighting, Floodlights, Fairy Lights, and Dot-Free LED Strips. Illuminate your space with energy-efficient, durable, and stylish lighting solutions.


Brighten Up Your Space: The Magic of Festoon Lighting
Discover the enchanting world of festoon lighting! Learn how these twinkling lights can transform any space into a cosy, inviting haven. Perfect for events, homes, and commercial spaces, festoon lighting adds an irresistible charm. Dive into our guide for tips, tricks, and creative inspiration.


The Advantages of Commercial Lighting
Discover the advantages of commercial lighting with Flexible Neon's offerings. Explore the longevity, energy efficiency, and aesthetic appeal of festoon lighting, LED floodlights, fairy lights, and LED modules for your projects.


Dot Less Led Strip Archway Nook


Illuminate Your Imagination: The Flexible Neon Revolution


Choosing the Right Christmas Lights: A Complete Guide by Flexible Neon


Why Choose Flexible Neon's Low-Voltage Lighting Solutions for Safety and Style


Creative Lighting Ideas for Restaurants and Cafés: Elevate Your Ambiance with Flexible Neon


Top 5 Commercial Applications of Neon LED Strips


How to Install Neon LED Strips: Step-by-Step Tutorial
Installing Neon LED strips is an excellent way to bring a vibrant and modern look to your space, whether it's for commercial signage, architectural highlights, or creative lighting designs. At Flexible Neon, we offer a range of high-quality neon LED strips in various sizes and styles, including 6x12mm, 8x16mm, 8x10x16mm, 10x13x22mm, and 15x13mm. With the right tools and preparation, installing these neon LED strips is a straightforward process. In this step-by-step guide, we'll cover different mounting surfaces, installation methods, wiring instructions, and essential safety tips. Plus, we'll showcase the variety of mounting clips and channels we offer to make your installation as seamless as possible.


Applications for Flexible Neon’s Commercial Grade Floodlights: Unmatched Versatility and Performance


Creating Year-Round Ambience with Warm White Fairy Lights


Understanding Lumens: A Comprehensive Guide for Choosing the Right Lighting


Enhance Your Retail Space with Neon LED Strips: A Guide for Business Owners


Fairy Lights for Commercial Use: Creating Magical Ambiences in Business Settings


Neon LED Strips vs. Traditional Neon Lights: Which is Better?


Innovative Festoon Lighting Solutions for Outdoor Events and Venues


The Science Behind Neon LED Strips: How Do They Work?


Future Trends in Neon LED Strip Lighting
Neon LED strip lighting has come a long way, evolving from simple decorative elements to versatile, high-tech solutions that transform spaces both aesthetically and functionally. As technology continues to advance, the future of neon LED strip lighting is set to introduce even more innovative trends and designs. In this blog, we'll explore the upcoming trends in neon LED strip technology and how these advancements will influence home and commercial lighting in the future. We’ll also highlight how Flexible Neon's extensive product range is at the forefront of these exciting developments.


How to Choose the Right Festoon Lighting for Your Business


LED Floodlights: How to Choose the Right Ones for Your Business


Transforming Event Spaces with Festoon Lighting


Creating Impactful Storefront Displays with Neon LED Strips


Custom Made Neon Lights: Boosting Your Brand's Visual Appeal


The Benefits of Commercial-Grade LED Strips for Businesses


Top 10 Benefits of Using LED Floodlights for Outdoor Lighting


How to Transform Your Space with Festoon Lighting: Creative Ideas and Inspiration
With festoon lighting, transforming any space into a charming and inviting area is as simple as flipping a switch. These versatile strings of light not only illuminate your surroundings but also infuse an air of magic into events, garden parties, and cosy indoor nooks.


Illuminate Your Outdoor Spaces with Festoon Lighting | Warm White LED Lights


Why Choose Flexible Neon's Festoon Lighting


Why Choose Extra Low Voltage Lighting for Your Business?
Embracing extra low voltage lighting within your business not only signifies a technological advancement but also embodies a strategic choice laden with a multitude of benefits. One of the foremost advantages lies in the heightened safety offered by low voltage systems. By inherently reducing electrical risks, these systems create a secure environment conducive to the well-being of both employees and customers. This is particularly true for establishments equipped with our collections, which include 12V, 24V, and 36V lighting solutions, ensuring enhanced safety across diverse business landscapes, from corporate offices to bustling retail hubs.
Furthermore, extra low voltage lighting seamlessly aligns with contemporary sustainability goals. Engineered for maximum energy efficiency, our 12V, 24V, and 36V lighting systems curtail overall energy consumption, leading to tangible reductions in operational expenditures. This not only contributes to lower costs but also positions your business as a champion of environmental stewardship. By opting for our eco-friendly lighting solutions, you demonstrate a commitment to sustainable practices, bolstering your brand reputation as a responsible custodian of the planet.
In an era where environmental consciousness is paramount, businesses that embrace our extra low voltage lighting solutions take a definitive stride towards a luminous, safer, and greener future. By prioritising safety, energy efficiency, and sustainability, you're not only illuminating your spaces but also setting a precedent for responsible and forward-thinking operational paradigms.


10 Creative Ways to Elevate Your Outdoor Space with Festoon Lighting
Festoon lighting has become a staple in outdoor decor, offering a versatile and charming way to illuminate outdoor spaces. Whether you're hosting a summer soirée, creating a cosy patio retreat, or adding ambience to your garden, festoon lighting can transform your outdoor area into a magical oasis. In this blog post, we'll explore 10 creative ways to use festoon lighting to enhance your outdoor space and create unforgettable moments under the stars.
-
String Along Fences and Railings: Drape festoon lights along fences, railings, or pergolas to create a warm and inviting atmosphere. The soft glow of the lights will add depth and dimension to your outdoor space while providing practical lighting for evening gatherings.
-
Illuminate Dining Areas: Hang festoon lights above outdoor dining tables to create an intimate and cosy ambience. The soft, diffused light will set the perfect mood for alfresco dinners with family and friends, making every meal feel like a special occasion.
-
Define Outdoor Seating Areas: Use festoon lighting to define outdoor seating areas and create visual interest in your backyard. Hang lights around seating areas, such as lounge chairs or benches, to delineate the space and draw attention to cosy nooks where guests can relax and unwind.
-
Line Pathways and Walkways: Guide guests to your outdoor space by lining pathways and walkways with festoon lighting. Not only will this add a touch of whimsy to your garden, but it will also provide a safe and well-lit passage for evening strolls.
-
Create a Canopy of Lights: Hang festoon lights overhead to create a canopy of lights that casts a warm and inviting glow over your outdoor space. This creates a magical ambience reminiscent of a starry night sky, perfect for romantic evenings or festive celebrations.
-
Highlight Outdoor Features: Use festoon lighting to highlight outdoor features such as trees, shrubs, or architectural elements. By strategically placing lights around key features, you can create a focal point and add drama to your outdoor landscape.
-
Decorate Outdoor Structures: Adorn outdoor structures such as pergolas, arbours, or gazebos with festoon lighting to enhance their beauty and charm. The soft, ambient light will transform these structures into enchanting focal points that beckon guests to gather and linger.
-
Add Colour with LED Bulbs: Experiment with coloured LED bulbs to add a playful and festive touch to your outdoor space. Whether you opt for vibrant hues or soft pastels, coloured festoon lights can instantly elevate the mood and create a festive atmosphere for outdoor parties and events.
-
Create a Cosy Fire Pit Setting: Enhance the ambience of your outdoor fire pit area by pairing it with festoon lighting. Hang lights overhead to create a cosy and inviting setting where guests can gather around the fire, share stories, and enjoy each other's company late into the night.
-
Extend Outdoor Living into the Night: With festoon lighting, you can extend your outdoor living space into the night, allowing you to enjoy your garden or patio long after the sun goes down. Whether you're hosting a dinner party, relaxing with a good book, or stargazing with loved ones, festoon lighting adds warmth and charm to your outdoor retreat.
From intimate gatherings to festive celebrations, festoon lighting offers endless possibilities for enhancing your outdoor space and creating memorable moments under the stars. Whether you're looking to add ambience to a cosy patio or transform your garden into a magical oasis, festoon lighting is sure to illuminate your outdoor adventures with style and charm. So, gather your loved ones, string up some lights, and let the magic of festoon lighting bring your outdoor space to life.


Choosing the Right E27 Festoon Cable
When it comes to creating stunning festoon lighting displays, choosing the right E27 festoon cable is crucial. Festoon cables not only provide the electrical connection for your lights but also play a significant role in determining the spacing and layout of your lighting arrangement. With various options available, selecting the ideal festoon cable can seem daunting. In this guide, we'll explore the different types of E27 festoon cables and provide insights to help you make the right choice for your lighting project.
Understanding E27 Festoon Cable Options: E27 festoon cables come in a variety of styles and configurations, each offering unique features and benefits. However, all the cables have a 80m max single feed festoon cable length. Here's a closer look at some common options available:
-
Festoon Cable BLK E27 Flat 0.25m Spacing (mtr): This type of festoon cable features a flat design with a spacing of 0.25 meters between sockets. It is ideal for creating densely packed lighting arrangements, providing a high concentration of lights in a limited space.
-
Festoon Cable BLK E27 Flat 0.50m Spacing (mtr): Similar to the 0.25m spacing option, this festoon cable features a flat design but with a slightly wider spacing of 0.50 meters between sockets. It offers a balanced combination of coverage and spacing, suitable for both indoor and outdoor applications.
-
Festoon Cable BLK E27 Flat 0.90m Spacing (mtr): With a spacing of 0.90 meters between sockets, this festoon cable provides ample room for larger lighting fixtures and allows for a more spread-out arrangement. It is ideal for illuminating outdoor spaces such as gardens, patios, and event venues.
-
Festoon Cable BLK E27 Round 0.50m (mtr): Featuring a round design with a spacing of 0.50 meters between sockets, this festoon cable offers a classic and elegant look. It is suitable for both indoor and outdoor use and provides flexibility in terms of layout and configuration.
-
Festoon Cable WHT E27 Round 0.50m Spacing (mtr): Similar to the black round festoon cable, this white round festoon cable also has a spacing of 0.50 meters between sockets. It adds a touch of sophistication to any lighting display and blends seamlessly with various decor styles.
-
Festoon Cable BLK E27 Round 0.50m with 0.4m droppers (mtr): This festoon cable combines the classic round design with droppers, allowing for easy installation and adjustment of the lighting arrangement. The droppers provide additional support and stability, making it suitable for outdoor use in windy conditions.
-
Festoon Cable BLK E27 Round 0.90m with 0.4m droppers (mtr): Similar to the previous option, this festoon cable features a round design with droppers but with a wider spacing of 0.90 meters between sockets. It offers enhanced stability and coverage, making it suitable for larger outdoor spaces and events.
Choosing the Right E27 Festoon Cable: When selecting an E27 festoon cable, consider factors such as the size of the space, the desired lighting density, and the overall aesthetic you wish to achieve. For smaller areas or tightly packed arrangements, opt for cables with shorter spacing. For larger spaces or more spread-out displays, choose cables with wider spacing. Additionally, consider the durability and weather resistance of the cable, especially for outdoor applications.
E27 festoon cables are essential components of festoon lighting setups, providing the electrical connection and layout for your lighting arrangement. By understanding the different options available and considering your specific needs and preferences, you can choose the right E27 festoon cable to create stunning and memorable lighting displays for any occasion. Whether you're decorating a commercial venue, hosting an outdoor event, or adding ambience to your backyard, the wide range of E27 festoon cable options ensures that you'll find the perfect solution for your lighting project.


Why Choose 24V Festoon Lighting?
While festoon lighting is available in various voltages, including 12V and 240V, opting for 24V festoon lighting offers many distinct advantages. Here's why you should consider choosing 24V festoon lighting for your next lighting project:
-
Enhanced Safety: One of the primary reasons to choose 24V festoon lighting is its enhanced safety features. Compared to higher voltage options, such as 240V, 24V lighting poses a significantly lower risk of electric shock, making it safer for use in both indoor and outdoor environments. This is particularly important for installations in public spaces, events, and areas frequented by children or pets.
-
Reduced Voltage Drop: Voltage drop occurs when electricity travels through a wire, resulting in a decrease in voltage along the length of the cable. With 24V festoon lighting, you'll experience less voltage drop compared to lower voltage options like 12V. This means that your lights will maintain consistent brightness and performance over longer cable lengths, ensuring even illumination across your installation.
-
Longer Cable Runs: The use of 24V festoon lighting allows for longer cable runs without sacrificing brightness or performance. This flexibility is especially beneficial for large-scale installations or outdoor lighting setups where longer cable lengths are required to cover expansive areas. With 24V lighting, you can achieve your desired lighting design without worrying about limitations imposed by voltage drop.
-
Compatibility with LED Technology: 24V festoon lighting is well-suited for use with energy-efficient LED bulbs and fixtures. LED bulbs offer numerous advantages over traditional incandescent bulbs, including lower energy consumption, longer lifespan, and enhanced durability. By choosing 24V festoon lighting compatible with LED technology, you can enjoy the benefits of efficient and eco-friendly lighting solutions for your home, business, or event.
-
Versatile Applications: Whether you're decorating a backyard for a garden party, illuminating a wedding venue, or enhancing the ambience of a commercial space, 24V festoon lighting offers versatile applications. Its low voltage, combined with a wide range of bulb styles and cable options, makes it suitable for a variety of indoor and outdoor settings, including gardens, patios, cafés, restaurants, festivals, and more.
-
Compliance with Regulations: In Australia, electrical regulations dictate the use of low-voltage lighting solutions for certain applications, particularly in outdoor and public spaces. Choosing 24V festoon lighting ensures compliance with relevant regulations and standards, giving you peace of mind knowing that your lighting installation meets safety requirements and guidelines.
24V festoon lighting offers enhanced safety, reduced voltage drop, longer cable runs, compatibility with LED technology, versatile applications, and compliance with regulations. Whether you're a homeowner, event planner, or business owner, opting for 24V festoon lighting provides a reliable and efficient lighting solution that delivers exceptional performance and aesthetic appeal for any occasion.


The Ultimate Guide to Festoon Lighting
Festoon lighting has become a popular choice for both indoor and outdoor lighting applications, adding a touch of charm and elegance to any space. Whether you're decorating your backyard for a summer party or illuminating a wedding venue, festoon lighting offers versatility, style, and ambience. In this comprehensive guide, we'll delve into everything you need to know about festoon lighting, from its history and types to installation tips and creative ideas.
1. What is Festoon Lighting? Festoon lighting, also known as string lighting or café lighting, consists of a series of bulbs suspended from a cable or wire at regular intervals. These lights are commonly used for decorative purposes in outdoor settings such as gardens, patios, weddings, festivals, and commercial spaces. Festoon lighting creates a warm and inviting atmosphere, making it ideal for both intimate gatherings and large-scale events.
2. The History of Festoon Lighting: Festoon lighting has its roots in traditional outdoor lighting used for festivals, celebrations, and special occasions. Historically, festoon lights were often hung between buildings or across streets to illuminate outdoor markets and public gatherings. Over time, festoon lighting evolved from simple incandescent bulbs to energy-efficient LED lights, offering greater flexibility and durability.
3. Why Choose 24v festoon lighting? 24V festoon lighting offers enhanced safety, reduced voltage drop, longer cable runs, compatibility with LED technology, versatile applications, and compliance with regulations. Whether you're a homeowner, event planner, or business owner, opting for 24V festoon lighting provides a reliable and efficient lighting solution that delivers exceptional performance and aesthetic appeal for any occasion.
4. Types of Festoon Lighting:
- Bulb Shape and Style: Festoon lights come in a variety of bulb shapes and styles, including round, globe, teardrop, vintage Edison-style bulbs, and more. Each style offers a unique aesthetic and can be customised to suit different themes and settings.
- Cable and Wire Types: Festoon lighting cables and wires are available in various materials, including rubber, PVC, and fabric-covered options. These materials offer different levels of durability, weather resistance, and flexibility to accommodate different installation requirements.
- Bulb Spacing: Festoon lights are available with different spacing between bulbs, ranging from close spacing for a densely lit effect to wider spacing for a more subtle and ambient glow.
- Festoon Accessories: Choose from our amazing range of festoon accessories, including; white/Firetruck Red/Black Shades, Black/White droppers, Beehive lanterns, Rectangular lanterns, Cylinder lanterns, Round lanterns.
5. Festoon Lighting Applications: Festoon lighting can be used in a wide range of indoor and outdoor settings, including (80m Max Single Feed Festoon Cable Length):
- Backyards and Gardens: Create a magical ambience for outdoor parties, BBQs, and gatherings.
- Weddings and Events: Add a romantic touch to wedding ceremonies, receptions, and special events.
- Cafés and Restaurants: Enhance outdoor dining areas with inviting and stylish lighting.
- Festivals and Markets: Illuminate outdoor festivals, markets, and fairs with festive lighting displays.
- Commercial Spaces: Enhance the exterior of businesses, storefronts, and venues with eye-catching lighting designs.
6. Choosing the Right Festoon Lighting: When selecting festoon lighting for your space, consider the following factors:
- Bulb Type and Style: Choose bulbs that complement your theme and desired ambience, whether it's vintage Edison bulbs for a rustic look or colourful LED bulbs for a festive vibe.
- Cable Length and Spacing: Measure the area you wish to illuminate and select the appropriate cable length and bulb spacing to ensure even coverage and proper installation.
- Weather Resistance: Our IP44 Rated rubber cable is built for the outdoors and will withstand exposure to the elements.
- Power Source: Determine the wattage needed to power the 24v Festoon Cable.
7. Festoon Lighting Installation Tips:
- Plan Your Layout: Determine where you want to hang your festoon lights and measure the area to calculate the required cable length and spacing.
- Secure Mounting Points: Identify suitable mounting points such as trees, poles, fences, or walls to support the weight of the festoon lighting.
- Install Support Structures: Use cable ties, hooks, or clips to secure the cable or wire along the desired route, ensuring it is taut and properly supported.
- Test the Lights: Before permanently installing the lights, test each bulb to ensure they are functioning correctly and replace any faulty bulbs as needed.
- Consider Dimming Options: Explore dimmable festoon lighting options to adjust the brightness and create the perfect ambience for different occasions.
8. Festoon Lighting Creative Ideas:
- Canopy of Lights: Hang festoon lights overhead to create a magical canopy effect for outdoor dining areas, dance floors, or wedding ceremonies.
- Tree Wraps: Wrap festoon lights around tree branches or trunks to highlight the natural beauty of trees and add a whimsical touch to garden landscapes.
- Marquee Backdrop: Use festoon lights as a backdrop for photo booths, stages, or marquees at weddings, parties, and events.
- Pathway Lighting: Line pathways, walkways, or driveways with festoon lights to guide guests and create a welcoming entrance to your home or venue.
- Colourful Displays: Mix and match different bulb colours to create vibrant and eye-catching lighting displays for festive occasions.
9. Maintenance and Safety Tips:
- Regular Inspection: Periodically inspect the festoon lights for signs of wear, damage, or loose connections, and replace any faulty bulbs or cables promptly.
- Weather Protection: Protect outdoor festoon lighting from harsh weather conditions by using waterproof cables, covering exposed connections, and securing lights during storms or high winds.
- Safe Installation: Ensure proper installation by following our guidelines, avoiding overloading electrical circuits, and using outdoor-rated extension cords and connectors.
- Timer Controls: Use timer controls or smart lighting systems to automate the operation of festoon lights, conserving energy and ensuring they are only illuminated when needed.
Festoon lighting offers a versatile, stylish, and practical lighting solution for a wide range of indoor and outdoor applications. Whether you're hosting a backyard soirée, planning a wedding reception, or decorating a commercial space, festoon lighting can transform any space into a magical and inviting environment. By considering factors such as bulb style, cable type, installation tips, and creative ideas, you can select the perfect festoon lighting setup to suit your needs and create unforgettable lighting displays that captivate and delight.


Understanding Festoon Accessories
Festoon lighting has become increasingly popular for both indoor and outdoor events, adding a touch of ambience and charm to any space. However, choosing the right festoon accessories can be overwhelming with the plethora of options available. In this guide, we'll delve into the various festoon accessories and provide insights to help you make the best choices for your specific needs.
Understanding Festoon Accessories: Festoon accessories encompass a wide range of items that enhance the functionality and aesthetics of festoon lighting setups. From shades and droppers to lanterns of different shapes and sizes, these accessories offer versatility and customisation options to suit any event or space.
-
Shades: Shades are one of the most popular festoon accessories, available in a variety of colours and styles to complement different themes and settings. White shades create a soft, elegant glow, while Firetruck Red adds a vibrant pop of colour, ideal for festive occasions. Black shades offer a sleek and modern look, perfect for contemporary settings. When choosing shades, consider the atmosphere you want to create and select colours that align with your overall design scheme.
-
Droppers: Droppers play a crucial role in suspending festoon lights, providing stability and support. Black and white droppers are commonly used and blend seamlessly with most decor styles. These droppers are available in different lengths (20cm, 40cm, 60cm & 80cm), allowing you to customise the height of your festoon lights to suit the size and layout of your space. When installing festoon lighting, ensure that droppers are securely attached to prevent accidents and ensure safety.
-
Lanterns: Lanterns are a charming addition to festoon lighting setups, offering visual interest and texture. There are various types of lanterns available, including beehive, rectangular, cylindrical, and round lanterns, each with its unique shape and design. Beehive lanterns exude a rustic, whimsical charm, while rectangular lanterns offer a contemporary edge. Cylinder and round lanterns provide a classic and timeless look, suitable for a wide range of events and occasions. Consider mixing and matching different lantern styles to create visual contrast and dimension in your lighting design.
Tips for Choosing Festoon Accessories:
- Consider the theme and ambiance of your event or space.
- Select accessories that complement your existing decor and colour scheme.
- Opt for high-quality materials that are durable and weather-resistant, especially for outdoor use.
- Experiment with different combinations of shades, droppers, and lanterns to create a unique and personalized lighting display.
- Prioritize safety by ensuring proper installation and maintenance of festoon accessories.
Choosing the right festoon accessories is essential for creating an inviting and captivating atmosphere for your event or space. Whether you prefer classic lanterns or modern shades, there are plenty of options available to suit your style and preferences. By carefully considering your design goals and selecting accessories that enhance your lighting setup, you can create a stunning and memorable ambience that will impress your guests and elevate your decor.


Buy Floodlights
When it comes to illuminating outdoor spaces, our floodlights are indispensable for creating ambience, enhancing security, and highlighting architectural features. At Flexible Neon, we offer a wide range of floodlights tailored to meet diverse lighting needs, from single-coloured options to RGBW variations in various wattage. Let's explore the options we provide and their versatile uses in architectural lighting design.
-
Single-Coloured Floodlights: Our single-coloured floodlights are designed to deliver powerful and uniform illumination, making them ideal for accentuating architectural elements, landscaping, and outdoor areas. Available in wattage ranging from 50W to 200W, these floodlights provide reliable and energy-efficient lighting solutions for commercial and residential applications.
-
RGBW Floodlights: For those seeking dynamic and customisable lighting options, our RGBW floodlights are the perfect choice. With the ability to produce millions of colours and various lighting effects, these floodlights offer unparalleled versatility. Available in wattage of 250W and 500W, our RGBW floodlights are suitable for large-scale architectural projects, event lighting, and outdoor installations where colour-changing capabilities are desired.
Uses and Applications:
-
Architectural Lighting: Whether illuminating facades, highlighting building features, or creating dramatic lighting effects, our floodlights are essential for architectural lighting design. Their versatility allows architects and designers to enhance the aesthetics of any structure and create visually striking environments.
-
Outdoor Spaces: From gardens and parks to stadiums and parking lots, our floodlights provide reliable and efficient illumination for outdoor spaces of all sizes. Whether used for security lighting, landscape illumination, or outdoor events, our floodlights ensure safety and visibility in any environment.
-
Wall Washing: Our wall washer floodlights are specifically designed to evenly wash walls with light, creating a uniform and visually appealing glow. Ideal for highlighting textured surfaces, architectural details, and signage, wall washer floodlights add depth and dimension to any space.
-
Linear Wall Washer: Our linear wall washer floodlights offer precise and uniform illumination along architectural surfaces, such as building facades, bridges, and monuments. Their sleek and compact design makes them perfect for applications where space is limited, while their high-performance LED's ensure long-lasting and efficient operation.
At Flexible Neon, we understand the importance of reliable and high-quality lighting solutions in architectural design. Our floodlights are engineered to deliver exceptional performance, durability, and versatility, making them the perfect choice for commercial-grade lighting projects in Australia and beyond.
Whether you're illuminating a building facade, enhancing outdoor landscapes, or creating dynamic lighting effects, our floodlights are designed to meet your unique lighting needs. Explore our range of floodlights today and elevate your architectural lighting design with Flexible Neon.


Buy Flexible Neon
In the realm of architectural lighting and beyond, the captivating glow of neon is unparalleled. At Flexible Neon, we offer a diverse range of neon options tailored to elevate any space or project, from architectural lighting to sign making and accent lighting. Let's delve into the various options we provide and explore the myriad of versatile uses for each.
-
6x12mm Neon Flex: The slender and discreet 6x12mm Neon Flex is ideal for creating stunning signage. Its compact size allows for intricate detailing, making it a popular choice for custom neon signs that command attention and convey messages with flair.
-
8x16mm Neon Flex: For those seeking to make a bold statement, the 8x16mm Neon Flex offers a wider profile suitable for both architectural lighting and accentuating signage. Its flexibility makes it easy to shape and mould, allowing for creative applications in various indoor and outdoor settings.
-
8x10x16mm Neon Flex: Designed for durability and versatility, the 8x10x16mm Neon Flex is not only resilient enough for outdoor installations but also perfect for accent lighting in interior spaces. Its robust construction makes it a reliable choice for architectural lighting fixtures, while its vibrant glow adds ambience and visual interest to any environment.
-
10x12x22mm Neon Flex: With its larger profile and maximum impact, the 10x12x22mm Neon Flex is perfect for creating eye-catching signage that demands attention. Its versatility extends beyond signage to accent lighting, where it can be used to highlight architectural features, create focal points, or set the mood in any space.
-
13x15mm Neon Flex: The 13x15mm Neon Flex strikes a balance between size and flexibility, making it suitable for a wide range of applications. Whether used for accent lighting or decorative installations, its versatility knows no bounds, allowing for endless creative expression.
At Flexible Neon, we pride ourselves on delivering customisable neon solutions tailored to your specific needs. Whether you're looking to enhance a commercial space, create captivating signage, or add ambience to a residential interior, our team of experts is dedicated to helping you bring your vision to life.
With our commitment to quality, versatility, and innovation, Flexible Neon is your go-to destination for all your neon lighting needs. Explore our extensive range of options and discover the transformative power of neon in architectural design, signage, and accent lighting. Experience the beauty of neon and elevate your space with Flexible Neon today.


Benefits of Investing in Flexible Neon Signs For Your Business


Setting Up Christmas Lights
Illuminate the Festive Season
The magical allure of Christmas lights brings joy and warmth to the holiday season. Follow this comprehensive guide to create a dazzling display that spreads festive cheer in your home or outdoor space.
1. Planning Your Display:
- Theme: Decide on a theme—classic, modern, or whimsical.
- Colour Scheme: Choose a colour palette that complements your theme.
- Areas to Decorate: Identify key areas like the porch, roof, trees, and windows.
2. Gathering Supplies:
- Lights: Select LED lights for energy efficiency and durability.
- Extension Cords: Ensure you have sufficient cords for reaching all areas.
- Timers: Use timers to automate your lights' schedule.
- Decorative Elements: Consider ornaments, wreaths, and figurines to enhance the display.
3. Checking Lights:
- Inspect: Before installation, check lights for damage or malfunction.
- Replacement: Replace any faulty bulbs to maintain consistent illumination.
4. Safety First:
- Outdoor Rated Lights: If decorating outside, use lights rated for outdoor use.
- Secure Wiring: Secure cords to avoid tripping hazards.
- Avoid On Connecting: Do not keep plugging in power boards to power boards this can be very unsafe!
- Weather Protection: Ensure electrical connections are protected from the weather.
5. Installing Lights:
- Start with Outlines: Outline rooflines, windows, and doors first.
- Wrapping Trees and Bushes: Use a zigzag or circular pattern for a professional look.
- Cascading Lights: For trees, let lights cascade evenly for a stunning effect.
6. Highlighting Special Features:
- Focus on Key Elements: Emphasise special features like a wreath or a centrepiece.
- Pathway Lighting: Use pathway lights for a welcoming entrance.
7. Balancing Colours:
- Even Distribution: Ensure an even distribution of coloured lights.
- Complementary Colours: Mix warm and cool colours for visual appeal.
8. Adding Personal Touches:
- DIY Ornaments: Craft personalised ornaments to hang on your tree.
- Custom Signs: Create signs or banners to convey holiday messages.
9. Testing and Adjusting:
- Test Regularly: Regularly test your lights throughout the season.
- Adjust as Needed: Make adjustments to achieve a balanced and harmonious display.
10. Sustainable Practices:
- LED Lights: Opt for energy-efficient LED lights.
- Timers and Sensors: Use timers and motion sensors to conserve energy.
11. Showcasing Your Work:
- Capture Photos: Document your creation with photographs & make sure to tag #FlexibleNeon
- Share the Joy: Share your display with friends and on social media.
Creating a festive light display is an art that combines creativity, safety, and a dash of holiday spirit. Use this guide to illuminate your surroundings and share the magic of Christmas with the world.


Connecting Low Voltage Wires to Flexible Neon Product
Connecting low voltage wires together is a common task when working with lighting systems like festoon cables, LED drivers, dotless strips, modules, flexible neon, and more. Follow this detailed guide to ensure safe and reliable connections for your low voltage lighting projects.
Materials You Will Need:
- Low voltage wires (such as festoon cable, dotless strip wires, module wires, or flexible neon wires).
- Wire cutters/strippers.
- Soldering iron and solder (for permanent connections, if needed).
- Heat shrink tubing (for added insulation and protection).
- Wire connectors (such as wire nuts, butt connectors, or crimp connectors).
- Electrical tape (as an alternative to heat shrink tubing).
- Cable ties (for cable management).
- Heat gun or lighter (if using heat shrink tubing).
- Safety gear: Safety goggles and heat-resistant gloves.
Procedure:
1. Safety First:
- Always work in a well-ventilated area.
- Wear safety goggles and heat-resistant gloves to protect your eyes and hands.
2. Prepare the Wires:
- Ensure that the low voltage wires you plan to connect are clean, undamaged, and stripped of any damaged insulation.
- Strip the ends of the wires to expose approximately 1/4 to 1/2 inch (6-12 mm) of bare wire. Use wire strippers to do this.
3. Choose the Connection Method:
Wire Connectors (WAGO):
- Wire connectors are a quick and reliable way to connect low voltage wires together. They come in various sizes to accommodate different wire gauges.
- To use wire connectors:
- Insert the prepared wires into the open slots of the WAGO connector. Make sure that each wire goes into its designated slot based on size and polarity.
- Once the wires are inserted correctly, close the clamping unit securely. This action will grip the wires tightly, establishing a secure connection.
- Ensure that the wires are held firmly in place by gently tugging on them.
Soldering (for Permanent Connections):
- Soldering provides a strong and secure connection. This method is ideal for applications where you don't want any chance of wires coming loose.
- To solder wires together:
- Twist the exposed ends of the wires together.
- Heat your soldering iron to the appropriate temperature for your solder.
- Apply the soldering iron to the twisted wires to heat them.
- Apply solder to the heated wires, allowing it to flow evenly over the twisted area.
- Remove the soldering iron and let the solder cool and solidify. Ensure the wires are held in place until the solder hardens.
- Optionally, slide heat shrink tubing over the soldered area and use a heat gun or lighter to shrink it for added protection.
4. Insulate the Connection:
- If using wire connectors, they provide built-in insulation.
- If soldering, slide heat shrink tubing over the soldered area or use electrical tape to insulate the connection.
- If using heat shrink tubing, apply heat evenly using a heat gun or lighter until the tubing shrinks and seals the connection tightly. Ensure there are no gaps in the tubing.
5. Secure and Organise the Wires:
- Use cable ties or clips to secure and organise the connected wires, keeping them neat and tidy.
6. Test the Connection:
- Before energising your lighting system, test the connection to ensure it's secure and functioning correctly.
7. Repeat as Needed:
- Repeat the above steps for all the low voltage wire connections in your project.
By following these steps, you can safely and effectively connect low voltage wires for your festoon cables, dotless strips, modules, flexible neon, and other low voltage lighting applications. Always adhere to safety guidelines and manufacturer recommendations for your specific lighting products.


How To Solder Flexible Neon (12V)
Soldering Flexible Neon (12V) can be a precise process, but with the right tools and technique, it can be accomplished effectively. Here's a detailed guide on how to solder Flexible Neon for single-colour, RGB, and pixel applications:
Note: Before you begin, make sure you have the appropriate safety gear, such as safety goggles and heat-resistant gloves, and that you're working in a well-ventilated area. Also, ensure you're using the correct soldering equipment and have some experience with soldering techniques.
Materials You Will Need:
- Flexible Neon (12V) with the required connectors
- Soldering iron with a fine-tip soldering station
- Solder wire
- Wire strippers
- Wire Cutters
- Silicone Glue
- Flux (optional, for improved solder flow)
Procedure:
1. Prepare Your Work Area:
- Ensure your work area is clean, well-ventilated, and free from any flammable materials.
- Set up your soldering iron on a heat-resistant surface.
- Put on your safety goggles and heat-resistant gloves.
2. Prepare the Wires:
- Strip the insulation from the ends of the wires you intend to solder. Typically, you'll need to expose about 1/4 inch (6mm) of wire.
- Twist the exposed wire strands together to prevent fraying.
3. Tinning the Wires:
- Heat the soldering iron to the appropriate temperature.
- Apply a small amount of solder to the tip of the soldering iron (this is called tinning).
- Carefully touch the tinned tip of the soldering iron to the exposed wire. The heat will transfer, and the wire should start to melt the solder.
- Apply a little more solder to ensure the wire is fully coated and tinned. This will help with the actual soldering process.
4. Soldering the Connections:
For Single Colour:
- Match the positive and negative wires to their corresponding pads on the Flexible Neon.
- Hold the tinned wire against the pad and apply the soldering iron to the wire and pad simultaneously.
- Allow the solder to melt and flow, creating a secure connection.
- Remove the soldering iron and let the solder cool and solidify. Ensure the wires are held in place until the solder hardens.
- Test the Flexible Neon to ensure it's functioning correctly.
For RGB:
- Solder the positive polarity wire to its respective pad on the Flexible Neon.
- Identify the Red, Green, and Blue terminals for the negative polarity wires.
- Solder each negative wire to its corresponding terminal on the Flexible Neon.
- Make sure the wires are securely attached, and the solder joints are clean.
- Test the Flexible Neon to ensure it's functioning correctly.
For Pixel:
- Solder the positive and negative polarity wires to their respective pads on the Flexible Neon.
- Locate the data signal wire and solder it to the Data pad on the Flexible Neon.
- Ensure that all solder connections are solid and without any short circuits.
- Test the Flexible Neon to ensure it's functioning correctly.
5. Waterproofing and Protecting the Connections:
- Inspect your soldered connections to ensure they are clean and secure.
- Fill exposed pads with silicone glue and slide your desired end cap onto the Flexible Neon.
- This will help retain its IP rating
6. Final Checks:
- Inspect your soldered connections to ensure they are clean and secure.
- Make sure there are no loose wires or exposed connections.
- Test the Flexible Neon to ensure it's functioning correctly.
Remember to exercise caution when working with hot soldering irons, and always follow safety guidelines to prevent burns or other injuries. If you're unsure about any part of the soldering process or need assistance with choosing the right controller, it's advisable to contact Flexible Neon for guidance and support.


Direct Lighting Vs. Indirect Lighting: Illuminating Your Space Right
When it comes to creating the perfect ambience in your living or working spaces, understanding the nuances of lighting is crucial. Two of the most popular lighting schemes, direct lighting and indirect lighting, offer distinct advantages and applications. Before embarking on any lighting project, it's essential to grasp the key differences between them.
Direct Lighting: Focusing the Beam
Direct lighting is all about precision. In this scheme, the light source directs its rays to illuminate a specific area or object. The result is a focused and intense spotlight effect, creating a well-defined hotspot at the centre of attention. Think of the concentrated illumination from a desk lamp, and you have a classic example of direct lighting.
Indirect Lighting: The Art of Diffusion
Conversely, indirect lighting takes a different approach. Here, the light source emits its rays upwards, allowing light to diffuse throughout the space. Rather than concentrating on a particular area, indirect lighting bathes the entire room in a gentle, even glow. It achieves this by reflecting light off surfaces, such as ceilings or walls, before it spreads throughout the space.
Distinguishing Between Direct and Indirect Lighting
Understanding the distinctions between these two lighting schemes is vital. Let's explore the pros and cons of each:
Direct Lighting: Shedding Light on the Benefits
- Focus: Direct lighting excels at focusing on specific objects or areas, making it ideal for tasks and highlighting points of interest.
- Highlight: It creates defined hotspots, making it perfect for showcasing products, exhibits, or architectural details.
- Safety: Direct lighting enhances visibility in potentially hazardous or dimly lit spaces, such as stairs or roads.
- Aesthetic Appeal: When used thoughtfully, direct lighting can provide an aesthetic touch and create captivating shadow effects on walls.
Direct Lighting: Shedding Light on the Drawbacks
- Harsh Shadows: The concentrated light can create harsh shadows, which may not be ideal for all environments.
- Screen Reflection: Direct lighting can cause reflections on screens, potentially affecting visual comfort.
- Glare: It may produce glare, leading to eye strain.
- Uneven Lighting: The ceiling often remains dark as most of the light is directed downward.
Indirect Lighting: Benefits of the Subtle Approach
- Illusion of Spaciousness: Indirect lighting gives the illusion of a larger space by diffusing light evenly without revealing the light source.
- Glare Reduction: It minimises glare and is suitable for rooms with screens, such as those with TVs or computers.
- Soothing Atmosphere: Indirect lighting casts a calming, even light in all directions, creating a relaxed ambience in various settings.
- Structural Accentuation: It's excellent for accentuating unique structures in both interior and exterior spaces.
Indirect Lighting: Consider the Drawbacks
- Brightness: Indirect lighting may not provide enough illumination on its own and may need supplemental lighting.
- Dark Spaces: Over-reliance on ceiling-based indirect lighting can leave some areas of a room in relative darkness.
- Limited Visibility: In some cases, it may not offer sufficient visibility, particularly in workspaces.
When to Use Direct and Indirect Lighting
The choice between direct and indirect lighting largely depends on the purpose of the lighting and the space in question:
Direct Lighting - Ideal For:
- Home & Office: Direct lighting enhances workspaces, such as desks and conference tables.
- Work/Study Table: Table lamps offer focused illumination for reading or working.
- Kitchen: Ideal for task lighting over workstations and sinks.
- Museum & Art Gallery: Perfect for highlighting specific exhibits or artworks.
- Street Lights: Ensures safety by illuminating specific areas at night.
- Decoration: Direct lighting can serve as both functional lighting and decor.
Indirect Lighting - Ideal For:
- Ceiling & Wall Lighting: Creates a modern, ambient atmosphere.
- Kitchen Cabinet: Adds a touch of elegance and practicality.
- Bathroom: Enhances the overall look while ensuring practicality.
- Automobiles & Marines: Used for decoration and accent lighting.
- Hotel & Restaurants: Elevates interior and exterior aesthetics.
- Architectural Designs: Highlights architectural elements.
Combining Direct and Indirect Lighting
To achieve the best of both worlds, you can combine direct and indirect lighting in your space. For instance, use indirect lighting to create a warm, ambient atmosphere throughout the room, and then employ direct lighting to focus on specific tasks or areas.
Direct Lighting Vs. Indirect Lighting: The Verdict
While both direct and indirect lighting have their merits, indirect lighting often shines as the preferred choice for its even and elegant illumination. It reduces glare, provides superior visibility, and contributes to a modern aesthetic. In contrast, direct lighting can be ideal for spotlighting specific areas or objects but comes with limitations like harsh shadows and uneven lighting. Ultimately, the choice between these two lighting schemes depends on your specific needs and the desired ambience.
Types of Lighting Schemes:
Lighting schemes are categorised into five types:
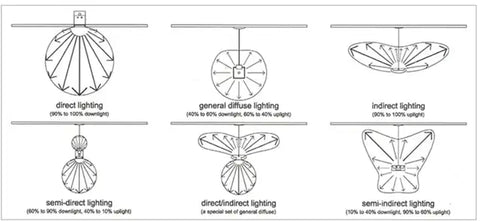
- Direct Lighting: Approximately 90% of the light is directed downwards, with some reflected upwards.
- Semi-Direct Lighting: Typically, 60% to 90% of the light is directed downward, with the remainder reflected upwards.
- Indirect Lighting: Around 90% of the light is emitted upwards, with some reflected downwards.
- Semi-Indirect Lighting: Similar to semi-direct lighting but with the distribution of light in the opposite direction.
- General Lighting: Light is evenly distributed in all directions, creating a soft, ambient illumination.
Understanding these lighting schemes can help you make informed decisions when designing the lighting for your space. Whether you prefer the precision of direct lighting or the elegance of indirect lighting, choosing the right lighting scheme can transform any room into a comfortable and functional environment.


Choosing the Right LED Flexible Neon for Your Lighting Project
When selecting an LED neon flex for your lighting project, several key factors must be considered to ensure it meets your specific needs. Here are the essential considerations:
1. Brightness: Determine the desired brightness by checking the lumen rating in the specifications. Higher lumen ratings indicate a brighter output. Flexible Neon employs high-quality SMD technology to ensure a consistently bright display. When choosing brightness levels within our range of neon, use the wattage as an indicator (higher wattage = brighter).
2. Waterproofing: For outdoor use, it's crucial to select a waterproof LED neon flex. Check the Ingress Protection (IP) rating, with IP67 or IP68 being ideal for water-resistant lighting.
3. Colour: Our range of Flexible Neon (12V) offer a wide range of colour options, including Emerald Green, Fire Truck Red, Hot Pink, Rose Pink, Light Pink, Icy Blue, Mars Green, Warm White 3000K, Neutral White 4000K, Pure White 6000K, Pixel, RGB, Royal Blue, Sun Yellow, Tangerine Orange. Our pixel neon allow you to control the colour pattern of specific sections, enabling dynamic lighting effects. Whereas RGB allows you to control throughout the colour wheel and through basic modes that the whole strip adheres to.
4. Dimension: The size and shape of the LED neon flex can impact its lighting output. A thicker and wider flex will provide more prominent illumination. Choose the dimension that aligns with your lighting requirements.
5. Shape: LED neon flexes come in various shapes, such as flat, slim, mushroom, semicircle, mini, and more. Each shape creates different lighting effects, so select one that suits your design objectives.
6. CRI (Colour Rendering Index): For applications where colour accuracy is crucial, consider the CRI rating. A CRI rating above 80 ensures high-quality colour representation.
7. Bend Type: Different LED neon flexes offer various bending options, including horizontal and vertical. Select the bending type that aligns with your design needs. Horizontal bending is particularly well-suited for creating signs and other designs where the neon flex needs to follow a specific shape or contour. This bending option allows for precise shaping, ensuring that your neon sign or lighting element accurately represents your intended design. Whether it's a logo, text, or any custom shape, horizontal bending provides the flexibility needed to bring your creative vision to life. Vertical bending, refers to the bending of the flexible neon strip in a vertical direction. This bending style allows you to create designs or lighting elements where the neon flex extends vertically or up and down.
8. Price: LED neon flex prices vary based on factors like structure, colour, and bending type. We at Flexible Neon try to keep our prices as affordable, to encourage a brighter and fun world.
9. Warranty: Pay close attention to warranty policies, especially for outdoor installations, where the neon must withstand harsh weather conditions. Our range of silicone is best suited for the outdoors due to its better UV rating.


How to Make a DIY Flexible Neon Sign
What Are Flexible Neon Signs?
Neon signs, reimagined with silicone rather than the traditional glass tubes filled with volatile gases, represent a contemporary shift in lighting technology. Unlike the outdated and potentially hazardous gas-filled methods, our silicone or PVC based neon signs offer a safer, more versatile, and energy-efficient solution. These signs harness the power of modern LED technology to deliver vibrant and customisable illumination, making them perfect for a wide array of applications, from signage to decorative lighting. They are suitable for outdoor advertisements and can also be used to decorate homes, offices, restaurants, and more.
How Do Flexible Neon Signs Work?
Silicone and PVC neon flex lights differ from traditional glass-tube neon signs. These contemporary alternatives use flexible materials and incorporate LED components for illumination. Inside these neon flex lights are LED's, which emit light when an electrical current passes through them. The specific materials and LED designs determine the light's colour, offering a wide range of customisation. These lights are flexible, durable, and energy-efficient due to LED technology, making them ideal for various applications, from signage to decorative lighting
Colours of Flexible Neon Signs
Our Flexible Neon colour range includes Emerald Green, Fire Truck Red, Hot Pink, Rose Pink, Light Pink, Icy Blue, Mars Green, Warm White 3000K, Neutral White 4000K, Pure White 6000K, Pixel, RGB, Royal Blue, Sun Yellow, and Tangerine Orange.
What Are Flexible Neon Signs?
Flexible Neon signs are an affordable alternative to traditional, costly neon signage. They are made using PVC or silicone-wrapped flexible linear SMD LED strips, known as Flexible Neon lights. These Flexible Neon is safer, more durable, and more cost-effective than traditional neon signs. Therefore, Flexible Neon lights are an excellent choice for creating DIY Flexible Neon signs.
How to Make Your Own Flexible Neon Sign
You can create your own Flexible Neon sign without professional assistance. It's a fun and creative project that you can accomplish with a few pieces of equipment and following some straightforward steps. Here's how you can design and craft your own Flexible Neon sign:
What Do You Need to Make a Flexible Neon Sign?
Before you embark on creating your Flexible Neon sign, gather the necessary materials and tools. Here's a list of what you'll need:
- Paper and pencil
- A surface to mount your sign on (we recommend black)
- Flexible mounting channel
- Screws
- Spray paint
- LED Neon flex lights in your desired colour and size
- Quick Connectors (if needed)
- Cutters suitable for Flexible Neon (42mm)
- Soldering Iron
- Wires (appropriate gauge)
- Hot glue gun
With these materials at hand, you're ready to bring your DIY Flexible Neon sign to life. Follow the subsequent steps to craft your personalised Flexible Neon sign.
Designing and Crafting Your DIY LED Neon Sign:
Follow along with our how-to video with one of our talented Flexible Neon team member on YOUTUBE
Now that you have gathered all the necessary materials, follow these detailed steps to create your personalised Flexible Neon sign:
Step 1: Design Your Sign
1.1. Begin by sketching your desired design for the Flexible Neon sign on a piece of paper. This will serve as your blueprint.
1.2. Pay close attention to the size and shape of your sign, as this will determine the length of Flexible Neon required.
Step 2: Prepare Your Mounting Surface
2.1. Choose a suitable surface to mount your Flexible Neon sign. It could be a wall, a wooden board, or any other flat surface.
2.2. If needed, paint or decorate the surface to enhance the visual appeal of your sign.
2.3. Spray paint your Flexible Channel to the colour of the surface.
Step 3: Secure the Flexible Mounting Channel
3.1. Attach the flexible mounting channel to your prepared surface. Use screws to secure it firmly in place.
3.2. Ensure that the mounting channel follows the shape and dimensions of your sign design.
Step 4: Measure and Cut the Flexible Neon
4.1. Measure the length of LED neon flex lights required for your design, following the outline of your sketch.
4.2. Use cutters suitable for Flexible Neon to trim the LED neon flex lights to the precise length needed.
Step 5: Wiring and Connection (please see our wiring guide for further details)
5.1. Examine the Flexible Neon lights and identify the input and output ends.
5.2. Using appropriate wires and a soldering iron, connect the input end of the Flexible Neon to the power source. Be sure to connect the right polarities, and to follow the manufacturer's instructions for wiring.
5.3. Secure the wires and connections to prevent any loose or exposed components. We recommend using silicone glue and end caps to protect the LED's.
5.4. Test the connection to ensure the Flexible Neon lights illuminate correctly.
Step 6: Install the Flexible Neon
6.1. Carefully insert the Flexible Neon into the flexible mounting channel, following the shape of your design.
6.2. Secure the Flexible Neon in place within the channel, ensuring they remain evenly spaced and aligned. Some silicone glue may be used for extra adhesion.
Step 7: Final Touches
7.1. Inspect the Flexible Neon for any loose components, exposed wires, or irregularities.
7.2. If necessary, use a hot glue gun to secure any loose parts and ensure a tidy appearance.
7.3. Make any final adjustments to the positioning of the Flexible Neon.
Step 8: Power Up Your DIY LED Neon Sign
8.1. Connect the Meanwell LED Driver to the Flexible Neon sign.
8.2. Turn on the power and enjoy the vibrant glow of your personalised Flexible Neon sign.
Tips and Precautions:
-
Safety First: When working with electrical components, prioritise safety. Ensure the power source is disconnected while making connections, and only turn it on once everything is securely in place.
-
Precision Matters: Measure and cut the Flexible Neon accurately to match your design. Precise cutting will ensure a professional-looking finished product.
-
Proper Wiring: Follow the manufacturer's guidelines for wiring and connections to prevent any electrical issues or damage to the Flexible Neon.
-
Securely Mount: Ensure the flexible mounting channel is firmly attached to the chosen surface to support the weight of the Flexible Neon.
-
Test Before Finalising: Before securing all components permanently, test the Flexible Neon sign to confirm that it functions correctly.
-
Creative Freedom: Don't hesitate to experiment with different colours and designs to achieve your desired aesthetic.
Creating your DIY Flexible Neon sign can be a rewarding and visually striking project. With attention to detail and safety precautions, you can craft a personalised piece of illuminated art to enhance your space or promote your message. Enjoy the vibrant glow of your unique creation!


Benefits of Using Extra Low Voltage (ELV) Lighting Systems
Extra Low Voltage (ELV) lighting systems provide numerous benefits, making them suitable for various applications. Their easy installation, enhanced safety features, and energy efficiency align well with the use of renewable energy sources, offering a practical solution for modern lighting needs.


Choosing the Right Wire Gauge for Flexible Neon Lighting Applications
Choosing the correct wire gauge for flexible neon lighting is essential for safety and efficiency. It is important to consider the current load and voltage drop to achieve optimal performance. Various American Wire Gauge (AWG) options are available to meet the specific needs of different lighting applications.


Understanding the Longevity of Flexible Neon LED Strip Lights
LED strip lights, like those offered by Flexible Neon, are renowned for their longevity and versatility. To understand how long these LED strip lights can last, it's essential to examine their structure and the factors that influence their lifespan.
The Structure of LED Strip Lights:
The main components of LED strips include LED's (Light Emitting Diodes), FPCB (Flexible Printed Circuit Boards), resistors, and other essential elements. These components are assembled using Surface Mount Technology (SMT) Assembly Process, which mounts LED's, resistors, and other components onto the FPCB.
Some outdoor or underwater LED strips may also have a protective silicone or PU glue coating. However, it's crucial to note that LED strips with higher IP ratings, designed for enhanced protection against dust and water, may have a somewhat shorter lifespan compared to IP20-rated LED strips. This is primarily because LED strips with higher IP ratings struggle to dissipate heat as efficiently. Generally, cooler environments support a longer LED lifespan, as higher temperatures tend to reduce light output. (For more details on how heat affects LED's, see "How are LED's affected by heat?")
Understanding LED Lifetime and the "L70" Rule:
Unlike traditional incandescent or fluorescent bulbs that fail abruptly, LED's gradually lose their light output over time. They continue working until they become too dim to be practical. The industry has established a standard for this gradual decrease in light output, known as the "L70" metric. It signifies the point at which an LED has dimmed to 70% of its original brightness.
In some instances, you may come across symbols like "LxByCz(h)" to describe the lifetime of LED luminaires. Here's what it means:
- "Lx" denotes the number of hours after which the luminous flux has dropped to x percent.
- "By" signifies the percentage of luminaires in the same group that have fallen below the specified luminous flux.
- "Cz" indicates the percentage of luminaires in the group that have experienced total LED failure.
For example, "L70B10C0.1 (50,000 h)" means that after 50,000 hours:
- The LED luminaires must still provide at least 70% of their initial luminous flux.
- Up to 10% of the luminaires can provide less than 70% of the initial luminous flux.
- In just 0.1% of the luminaires, all LED's may have failed.

How Is "L70" Calculated?
To calculate LED lifetime, a testing method called LM-80 is often employed. This method specifies a predetermined temperature and driving current for testing LED samples. The light output change is measured at intervals of 1000 hours, up to a maximum of 10,000 hours. Reputable manufacturers conduct LM-80 testing at third-party laboratories to ensure impartial results. They then publish these results in report format. It's important to note that reliable LED strip suppliers should be able to provide LM80 test reports, especially when purchasing large quantities.
However, LED life testing can be time-consuming. For instance, even with LED's operating 24/7, a 10,000-hour test takes around 14 months. This timeframe is impractical for fast-moving industries like LED lighting. To address this issue, the TM-21 extrapolation algorithm is employed. It considers the performance of LM-80-tested samples during the first few thousand hours and provides an estimated lifetime.
Factors Affecting LED Strip Light Lifespan:
Several factors can affect the lifespan of LED strip lights:
-
FPCB (Flexible Printed Circuit Board): High-quality, double-layer pure copper flexible PCBs facilitate the smooth passage of significant current, reduce heat generation, and promote efficient heat dissipation. By attaching the LED strip to an aluminium profile, you can dissipate heat effectively and lower the operating temperature, thus extending LED life.
-
Double-Sided Tape: Quality matters when it comes to adhesive tape. LED strip lights from reputable suppliers often use high-quality tapes, like the 3M brand VHB tape. Proper tape quality ensures long-lasting installations and good thermal conductivity.
-
Resistors: Resistors regulate the forward current through LED's to maintain their designed brightness. It's crucial to use high-quality resistors from reputable manufacturers to avoid shortening the LED strip's life or causing damage.
-
Power Supply: The power supply is a critical component. Always use a reliable, brand-name power supply to ensure stable voltage output. Low-quality power supplies can deliver unstable voltages that might exceed the LED strip's working voltage, potentially damaging it.
-
Heat Dissipation: Heat can significantly reduce LED lifespan. To manage heat effectively, install LED strips in well-ventilated areas. If feasible, attach the LED strip to an aluminium profile to aid in heat dissipation, as aluminium is an excellent conductor of heat.
By considering these factors and following best practices for installation and maintenance, you can maximise the lifespan of your Flexible Neon LED strip lights, ensuring they provide brilliant and reliable illumination for years to come.
